Friday, December 27, 2013

Revlon Selects and Christmas

Revlon Selects sent me some of their Revlon by Marchesa 3D Jewel Appliques, and I saved them for my company Christmas party.

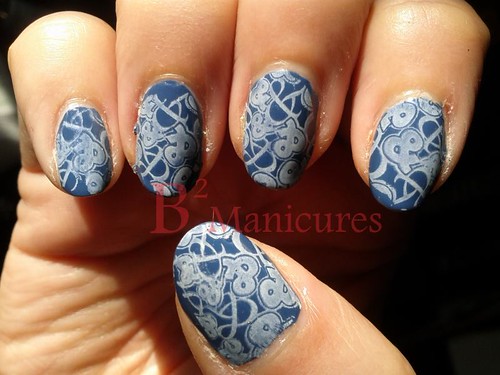
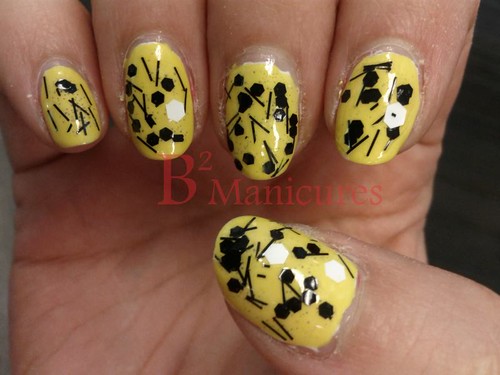
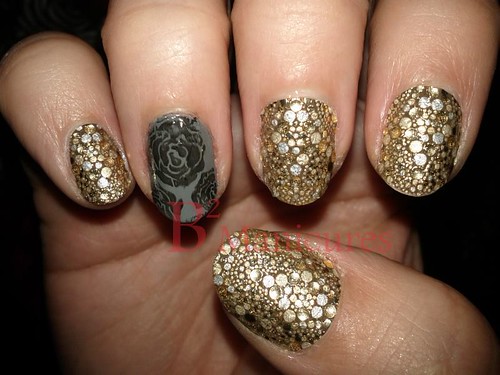
I used Gilded Mosaic - a very pretty gold and silver mosaic pattern.

113 Revlon Selects 3D Nail Stickers a

Last time I tried the appliques, they only lasted a day before peeling up, and I kinda got frustrated with them. I had used a basecoat, which I think was part of the problem. 

This time I followed a how-to blog post from someone else (I forgot to save the link, and now I can't find it), and didn't use a basecoat.

The how-to said to use a "feather touch" when filing off the excess sticker, and ... yeah, these are so thick that you need a little pressure. I was still being gentle though. Some of the ends were still ragged - though I think that's a product of the design on these ones and my nail length - some of the jewels popped off at the ends of my nails.
I touched up the ends and wrapped the tips with some gold polish, and because the ragged edges were still bugging me, I went over it with a topcoat (it had to last a couple of days, because I was working the day of the party).

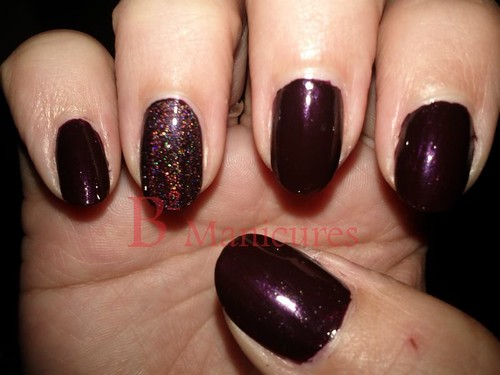
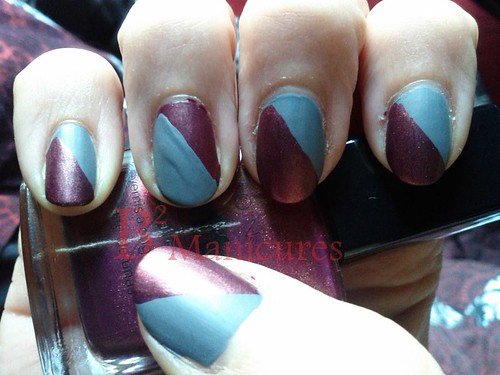
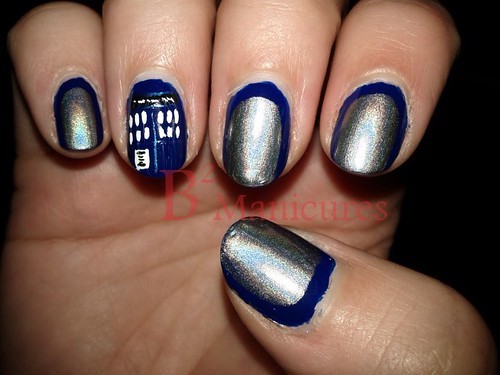
On my ring finger, I used Avon Matte Concrete, Essence Black is Back and Bundle Monster stamping plate 323 to create a nail that matched my party dress.

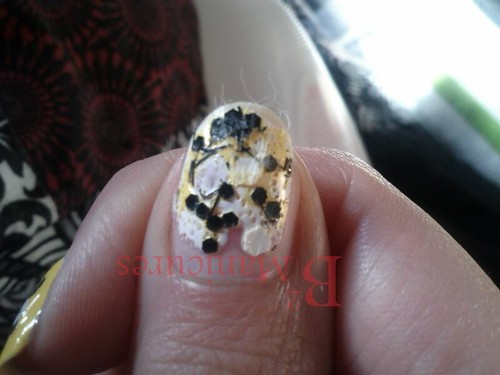
Now, the nail sitckers actually lasted several days this time before the design started to wear off, revealing the white base. 
I followed the directions, and peeled them up from the cuticle edge. Every finger except my thumbs (both hands), went well.

Here is what happened on my thumbs:

113 Revlon Selects 3D Nail Stickers b

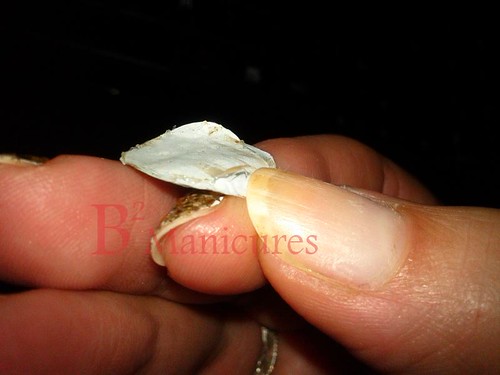
It peeled off a layer of my nail in some places - this was the better of the two. My other thumb had much larger sections peel off.
So, next time - basecoat for SURE.


After letting my nails rest for a few days, I decided that I needed to do something Christmas-y

114 Christmas Tree

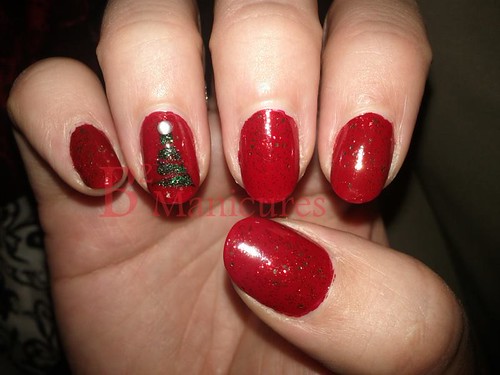
I used Color Club Red De Rio, then applied Claire's Cranberry scented polish from last year's scented holiday collection (it didn't really smell ... I think it's faded now). It's a fine red glitter with slightly larger gold glitter strewn throughout.
On my ring finger, I used a tutorial from Nailside to make a Christmas tree. I used China Glaze Winter Holly for the tree, and applied a gem to the top.
Winter Holly is a fun colour - packed with fine dark green glitter, and I think I spotted some gold and silver in there too.
My only complaint is the base of the glitter somehow caused the red to soak through my basecoat and stain my nail.

Friday, December 6, 2013

Revlon Selects - Revlon Parfumerie

I actually received a couple of Revlon Selects packages in the last couple of months.
First one was some more of their 3D nail strips. I got two designs. I gave one to a friend to try (I don't believe she's used strips before, so I wanted her take on them), and I kept one for myself to use for my company Christmas party - that's next weekend, so I'll have a review up hopefully next Monday.

The second box had a single polish in it - from their new Parfumerie line.

The bottles are super cute, rectangular with beveled edges, and the lid is small and round - it looks reminiscent of a simple perfume bottle. Obviously what they were going for, and it worked.
The smaller lid was actually pretty easy to work with. It's about the same height as a mini polish lid, but the shape makes it easier to hold than a traditionally shaped lid on a mini bottle.

The scent/shade I received is "Spun Sugar" - a metallic off-silver, almost pewter shade.

112 Revlon Selects Spun Sugar

This is two coats - I decided to fancy it up by adding a jewel to each nail (pale blue, round; from the Claire's gem wheel). I thought it would give it a bit of a wintery feel.

First coat wasn't quite opaque, but second coat evened it out. You can just barely see some brushstrokes; and I find that's pretty typical of these frosty metallics, so no complaints there

The scent is creamy and sweet. I don't really know how else to describe it.
I just applied it, so we'll see how long the scent lasts :)
While it was drying, the smell reminded me of a new magazine with an unopened perfume sample - weird, but that's where my brain went. Once it fully dries, the sugary scent really comes out.
I did find the scent to be a little on the strong side at first, but my nose has been very sensitive to perfumes lately. I don't know if I'm just used to it now or what, but it has mellowed out to where I can only really smell it if my fingers are about two inches from my nose.

I DID use a topcoat, and the polish passed the test. Once the topcoat was dry, the scent came back, just as strong as before.

The box also contained a brochure with two scent samples
- Autumn Spice:  looks like a beautiful coppery brown shimmery bottle of goodness, and it smells like pumpkin spice, which, well, I am obsessed with.
- Surf Spray: looks like a (metallic?) teal-blue, smell is very typical of "water" scented perfumese (if that makes sense). I don't really know how else to describe it.
There were 16 shades at the time of release, and it looks like there are more now.

If I don't get any of these for Christmas, I will be buying Autumn Spice, and another one I saw in stores called Italian Leather.

Monday, November 25, 2013

Emerald Eve

I wanted to do something with a glittery feature nail, so I went looking at my glitter polishes, and saw one I hadn't used yet. I paired it with a complimentary shade for the rest of my nails.

111 Emerald Eve

I started with two coats of OPI Cuckoo For This Color - this was a gift from a friend with great taste - haha! It is a shimmery dark teal. I guess you could describe it as an emerald green with a hint of blue. I don't even know what to say other than that; it's just really pretty.

On my ring finger, I applied a coat of Hard Candy Emerald Eve. Hard Candy polishes always surprise me - they are with glitter. This polish has tiny round emerald green glitter and larger round holographic gold glitter. I applied a thick-ish coat, and then remembered something else about Hard Candy polishes ... they dry fast!

I applied two coats of topcoat to the glittery nail just to help smooth out the texture.

Saturday, November 23, 2013

The Day of The Doctor

I've already established that I am a Doctor Who fan, so I have definitely been looking forward to today - the 50th anniversary of the show.

I figured I should do a manicure that would be appropriate for today.

110 Doctor Who 50th

I think I am most proud of my ring finger - it turned out pretty much exactly how I wanted.

The TARDIS on my thumb:

  • China Glaze First Mate - for the base
  • It's So Easy Stripe Rite Blue Metallic - for detailing
  • It's So Easy Stripe Rite Black - for detailing
  • Claire's White striping polish - for detailing
  • Sinful Colors Snow Me White - for the windows and the door sign


The 10th Doctor on my index finger:

  • Revlon Chocolate Truffle - for the jacket
  • It's So Easy Stripe Rite Blue Metallic - for the pinstripes
  • It's So Easy Stripe Rite Black - for detailing
  • Claire's White striping Polish - for the shirt
  • Chine Glaze First Mate - for the tie

The 11th Doctor on my middle finger:

  • Icing Skinny Dipping Beauty - for the jacket
  • It's So Easy Stripe Rite Black - for detailing and pants
  • Claire's White striping Polish - for the shirt
  • Sally Hansen Celeb City - for the buttons
  • Ink Nail Art Dark Red - for the bowtie


A Dalek on my ring finger:

  • Revlon Vincent Van Gold - for the base
  • It's So Easy Stripe Rite Black - for detailing
  • Claire's Gem Wheel - yellow rhinestones - for the "Dalek bumps"
  • Claire's Gem Wheel - silver rhinestones - for the eye stalk.


A Cyberman on my pinky:

  • Claire's Celeb City - for the base
  • It's So Easy Stripe Rite Black - for detailing


Also ... I just finished watching the special. So. Good.

Monday, November 18, 2013

Flakie Comic Nails

I wanted to do comic book nails again, but I thought it might be fun to add some flakies to it.

109 Flakie Comic

Two coats Color Club Love Links - this is a red with just a hint of orange. I picked this one up a while back on clearance from a local nail supply place. I was going to buy OPI's My Paprika Is Hotter Than Yours, but spotted this bottle for $1.99. It looked pretty close in the bottle, except the OPI had a slight shimmer to it. I was mostly looking for the shade, and I love a bargain, so Color Club won.

I added a coat of Icing By Claire's Rave Royalty - I really wish this one photographed better. The flakies are an iridescent orange-gold.

I applied a black outline using It's So Easy black striping polish and the "shine" detail using Claire's white striping polish. I think I could have left out the white, but it still looks good.

Monday, November 11, 2013

Mint Apple Caviar

I'm a big fan of deals on nail stuff - so, when Urban Planet started carrying nail stuff at 3 for $5, I had to look.

I mentioned the Nabi 3D Rainbow Effect polishes in my last post, I'm hoping to pick up the rest of them, because I really like them.

They also have other bits and pieces - I've wanted to try the beaded "caviar" manicure for a while, and they had a pack of 5 little vials of different coloured beads.

The blue-green beads were an almost perfect match for Sinful Colors Mint Apple.

108 Mint Apple Caviar

Each finger got two coats of Mint Apple.
I used a normal topcoat on my ring finger and then poured the beads over top into a little dish,
I used my normal quick dry topcoat on the rest.
It looks kind of cute, but the beads did start to pop off the next day, so this kind of a one-night manicure.

Wednesday, November 6, 2013

Catching up Part 2

I was looking up autumn nail trends, and found a couple of shades that I thought would really work well together: navy blue and chocolate brown. I also wanted to use the striping tape that I bought at a local Asian night market, so I thought diagonal two-tone would be fun.

104 Navy Brown

I used China Glaze First Mate for the blue and Revlon Chocolate Truffle for the brown. The striping tape is a holographic gold.
My topcoat picked up the brown and deposited it on the blue on a couple of nails ... oops.


Oxblood was another autumn trend, so I thought it would be a good choice.

105 Burgundy Holo b

I used two coats of Sally Hansen Burgundy Child for most of the fingers, and two coats of Nabi 3D Rainbow Effect in Tawny
The Nabi polishes aren't bad - I get them 3 for $5 at Urban Planet, and while not super strong, they do have a slight linear holo effect going on.

105 Burgundy Holo a


I needed some orange for Thanksgiving / Halloween:

106 Orange Holo b

3 coats Nabi 3D Rainbow Effect in Bronze (mine is mislabeled as "Brone" - hah!) and I did a "sideways Fench" with Avon Golden Twilight - a black with gold glitter.
Fuzzy image for the slight holo effect:

106 Orange Holo a


Finally, for Halloween, I decided to do something different on every finger.

107 Halloween

- Thumb was a vampire mouth: Color Club Red de Rio for the base, Claire's black detail polish in the middle and detailing at the top, Claire's white detail polish for teeth and a "shine" on the bottom lip.
- Index finger was a jack-o-lantern: Revlon Nude Beige base, NYC Pumpkin for the pumpkin, Claire's black detail polish for the face and outline, I used a no-name green glitter detail polish for the stem.
- Middle finger was one of my favourites - a ghost. I used Sinful Colors Snow Me White, added Wet n Wild glow in the dark topcoat, then created the outline with Claire's black detail polish - I used a dotting tool for the bottom and the eyes.
- Ring finger was my other favourite - a blob of slime. Revlon Nude Beige for the base, Nabi 3D Rainbow Effect in Green for the slime, Claire's black detail polish for the outline.
- Pinky was done by applying a layer of Sinful Colors Snow Me White, a layer of Sally Hansen Sun Kissed and finally a layer of Sally Hansen Mellow Yellow. I outlined it all with Claire's black detail polish to create the triangular Candy Corn shape.

phew!

Friday, August 30, 2013

Catching Up

Since I got back from the UK, work has been crazy, with terrible shifts, and when I'm not at work, we've been going out a lot.
It's just been a crazy summer, and I haven't been able to keep up here.

I've still been doing my nails though - so here's what I've got:

Polka Dots:

098 Polka Dots

This was a base of Sinful Colors Rain Storm
Dots were done using two sizes of a dotting tool and China Glaze Holographic in Cosmic Dust and Galactic Grey.
This was for the Reddit challenge "Polka Dots"

Neon:

099 Neon Yellow

I started with Sinful Colors Snow Me White to give the neon a solid base.
Three coats of Ardene Neon Yellow - this is a highlighter yellow. It's ridiculously bright.
Over top of that, I dabbed Icing By Claire's Shredded. This one is pretty neat, it's not really what I'd call flakies, but it's shredded black glitter. The clear base has a slight blue tint to it, so it unfortunately changed the yellow a bit. I tried to do a sort of gradient with it, and reversed the gradient on my ring finger.
This was for the Reddit challenge "Neon"

Secret Periwinkle:

100 Secret Periwinkle


oops! this was my 100th manicure on here.
um ... I'll try to remember to do something fancy for 150?
I bought China Glaze Secret Periwinkle, because periwinkle is an awesome colour. Not quite blue, a hint of lilac. This is a really nice polish - 2 coats. I will be wearing this often.

Green Mermaid:

101 Green Mermaid


Three coats of Wet n Wild Fast Dry Sage in the City.
For my ring finger, I poured out a small amount of hexagonal glitter on to a piece of tin foil, and added a dab of topcoat next to it (not fast dry!). I applied a coat of the same topcoat to my ring finger, and then used a toothpick dipped in the topcoat to pick up the glitter and applied it one-by-one to my nail. This didn't take as long as you'd think - but I don't know that I'd have the patience to do my whole hand. I had to apply two coats of a thick topcoat to seal it off, and even then, there was some texture.
This was also a giant pain in the butt to take off, even with the foil method.

Jeans:

102 Denim

My friend bought me a bottle of Maybelline Color Show Denim Dash - it's a pretty blue polish with fine silver glitter that dries matte. I used two coats for this manicure.
I added a stud to my ring finger, to look like the button, or the rivets on jeans.

Gorgeous Bling Bling:

103 BlingBling


In honour of the cooler weather these last few days, and inspired by the pumpkin body lotion I just bought from Bath and Body works, I decided I needed to use an autumn shade on my nails.
This colour is essence Gorgeous Bling Bling (what a terrible name!), but it really is a gorgeous colour. Rusty orange with teeny tiny orange-gold flakies.

phew. OK, I'll try to keep up with this a little better.

Monday, July 22, 2013

Reddit Challenge - Green

I'm sure I could have done something fancy with this one, but I wanted to do a plain colour.

095 Green 52R

This is Rimmel Rags to Riches.
A friend gave this one to me a couple of months ago, and when I saw there was a green challenge coming up, I knew I wanted to use this one.
It is a light metallic silvery green. I used three coats to get coverage that I was satisfied with (you could probably stop at 2, but in case you hadn't noticed by now, I like my polish very opaque). each coat dried very quickly.

In other news ... I got back from two weeks in England yesterday!
No, I didn't make the last two posts from there - I did the manicures before I left and scheduled the posts.
Later this week, I'll show you my nails for the trip along with some highlights from the trip!

Monday, July 15, 2013

Reddit Challenge - Delicate Print

I knew this one called for stamping, so I went through all my stamp plates, and finally settled on something lacy.

094 Delicate Lace 52R

I started off with three coats of Revlon Nude Beige, then stamped on the diagonal lace pattern from Bundle Monster plate BM-323 using Sinful Colors Snow Me White

Pretty, simple and delicate!

Thursday, July 11, 2013

Guest Post - Shilak

My Friend Miss Manpreet sent me a photo and writeup about a Shilak manicure she had done, and I wanted to share!

"So, I was in Prince George for my high school reunion and decided to treat myself with a Shilak. I went with a shimmery black. They applied 1 coat of Gel base and then 2 coats of the black. She then used the thin design brush from Sally Hansen in white and silver to create a design on my ring finger. She drew an eye shape with the white and then added on some silver dots. Loved them!"

photo

Monday, July 8, 2013

Reddit Challenge - Inspired by Colour

I have really liked blue lately, so I figured, why not choose blue for this challenge?

093 Blue 52R

I started with two coats of Ardene's Elektronika - a very pretty dark blue creme that I've used quite a bit. I used this as a base for the star of this manicure ...
Color Club Total Mystery - a sheer blue base with a blue-purple shimmer. I'd put this as a subtle duochrome - you can see it in the bottle, and you can sometimes see it on your fingers. I like it a lot, it's really pretty. I wish I could get better photos of it.

Wednesday, July 3, 2013

Hard Candy Black Tie Optional

Everyone is going crazy over this polish.
I get it now.

After failing with China Glaze Whirled Away a second time (no pictures were taken, but it was bubbly, lumpy and did not dry for /hours/), I grabbed a bottle of Black Tie Optional from my local Walmart.

Now, everyone says they have a very hard time finding this polish, but I've seen it every time I've been at Walmart. In fact, when the Hard Candy display was mostly empty, BTO was one of the only bottles left.
I guess the nail polish fanatics in Vancouver don't care for the black & white glitter trend? or they don't venture into Walmart?

Anywyas ... The black and white glitter thing started with indie polish makers. They were hard to find and often out of stock - when they came back in stock, they would sell out very quickly. Then everyone jumped on the bandwagon. Here is a not-so-complete list, because companies are still releasing new ones - I've seen new offerings from Maybelline, Claire's and a few others.


097 Peach BTO

For this manicure, I applied two coats of Barrielle Joytini, a peachy-orange almost jelly polish. I got this in a box set of polishes at Winners. The box said "New York Style", but when I looked up that set, Joytini wasn't in it (though, there was an orange), and there were other shades I didn't get. I guess it was random polishes thrown in the box. Not too surprised, because that's what happens with other sets at Winners. I've only actually seen one complete set. Not a big deal, I grabbed the set, because I liked the shades I saw, not because it was a specific set.

After those coats were thoroughly dry, I applied  a single coat of Black Tie Optional.
How was it? 
It was PACKED with glitter, so you can apply it like any old polish. And yes, that is only a single coat in the photo. Unlike Whirled Away, there was no dabbing was required. It is also super quick dry, so I could  apply a topcoat and be on my way without fear of denting or smooshing. I will say I had to dig a little bit to get the big hex glitter, but nothing like Whirled Away, where you had to dig for any glitter.

Monday, July 1, 2013

Reddit Challenge - Half-Moon or Border

The challenge had a choice for this one, and I chose border - half-moons can be really nice, but I had something specific in mind for Canada Day, and the border fit better.

092 Canadian Border 52R

On each finger I did two coats of OPI's Nice Color Eh? - I used this one for last year's Canada Day manicure
Over top of that, I did two coats of Sinful Colors Snow Me White, leaving a border around the top and sides of my nails. I considered closing off the bottom with a strip of Nice Color Eh?, but thought it looked nice without it.
After that was all dry, I stamped on some maple leaves from Bundle Monster plate BM04 (also used last year). Since the design is 3 maple leaves stacked on top of each other, I used the largest one for my thumb, and the mid-sized one for the rest of my fingers.
Unfortunately, I mucked up my pinky after applying topcoat :(

Wednesday, June 26, 2013

Revlon Selects 3D Jewel Appliques

Ok,
It's been a while since I did a review of a product sent to me by Revlon. I had bare nails and I didn't want to wait for nail polish to dry, so I reached for my pack of 3D Jewel Appliques. I received the Floral Fatale pattern.

This is a very cute and busy pink/white/black/silver pattern. Flowers and silver geometric shapes. It even has a bit of an iridescent shine to it.

096 Revlon Floral Fatale

The Review:

First up, I read the instructions - pick the right size, apply, fold over nail edge, file off excess. Just like all the other nail strips out there. Easy as pie!
Then I looked at removal. These are not real nail polish, so for removal, you simply peel them off starting at the cuticle.
My heart sank a bit at that, because I have weak nails, and peeling things off of your nails can really damage them.

I elected to apply a basecoat to help prevent damage.

Application was super easy - peel and stick, smooth down.
The only minus here were the small range of sizes. My index, middle and ring fingers are all pretty much the same size - it was tough getting ones to fit. I ended up using a couple of slightly too-small ones. Also, my thumb was in-between the largest and second largest size, so I had to trim that one down - which is pretty normal.

The excess strip filed away pretty easily, but I encountered a slight hitch ... I had stretched one of them to make it fit, but once I filed the end off, it un-stretched and I had a bare patch at the tip of my nail. It was small and the busy pattern on the applique hid it well, so I figured it was ok.

I wore it, went to bed, woke up and had my shower.
This is when it all started to fall apart. They caught in my hair, shifted and lifted. I'm not sure if this is because I used a basecoat, so your mileage may vary.

I peeled them off afterward and they came off really nicely - it looks like the adhesive is gentle enough that it shouldn't damage your nails. It only lifted the basecoat off of one nail. I'm just wondering if they elected to go for a gentle adhesive rather than staying power.

Verdict: they're cute if you want a cute complex pattern without all the work. Probably only good for a couple of days. I personally wouldn't buy them, but I think they'd be great for a lot of people - especially if they wanted a really fancy manicure for an event.

Monday, June 24, 2013

Reddit Challenge - Matte

This week's challenge is Matte.
I have two matte polishes, so I figured I would use those, rather than just using a matte topcoat.

I went with a simple two-tone diagonal manicure.

091 Diagonal Matte 52R

Avon Matte Concrete - grey. This can get a little thick - as you can see on my ring finger. But it's a really pretty shade of grey.
Avon Matte Red Velvet - shimmery burgundy with a bit of gold. This one is a bit easier to work with than the grey, it looks really pretty both shiny and matte.

I did this one freehand, but you can do this type of manicure really easily with tape (and you'll get straighter lines)

Monday, June 17, 2013

Reddit Challenge - Inspired by a Movie / TV

This one was actually pretty easy, because I've wanted to do this as a manicure for a little while ...

The movie I picked was "Oz the Great and Powerful"

Here is a picture where you can sort of see the manicure in question:


And, here is my version:

090 Evanora 52R

I started with one coat of Essence Sweet as Candy for a sheer base.
Then I drew a triangle on my nail with Zoya Envy - an almost-black pine green.
I went over top of that with China Glaze Winter Holly
Finally, I did a line of gold just inside the edges of the triangle - I used my Icing by Claire's gold striping polish.

Thursday, June 13, 2013

Reddit Challenge - Summer and Galaxy

This is proving to be a busy few months!

I have two weeks for you again.

First up is Summer ... I actually received an email from Butter London with a video tutorial on how to achieve this look using their summer shades. I picked 3 similar shades from my collection and went at it. I'm not that great with my dotting tools yet ... but I'm sure I'll get better at it.
Super bright and super cute!

088 Summer Dots 52R

1 coat of Sinful Colors Snow Me White
1 coat of Essence Wanna Be Your Sunshine
Blue dots with an unnamed blue from an Ombre set I bought.
Pink dots are Sinful Colors Dream On


After I took off the above manicure, the nails on my left hand started to peel really, really badly, so I had to cut and file my nails down to nubbins ...

Next challenge is Galaxy - I wanted to do a single galaxy on all my fingers - I think it worked.

089 Blue Galaxy 52R

This was done using mostly Essence polishes, so I'll just list the shades.
2 coats of  Black is Back
Using a sponge, I dabbed on (in order) Choose Me!, Walk on the Wild Side, Let's Get Lost, Grey-t To Be Here, and Date in the Moonlight.
On top, I dabbed a bit of KiSS Big Break Blue #3 (glitter in a very sheer blue jelly base) from their blue Gradation kit.
Then I finished it off with Quo silver glitter from their "Nice" Christmas nail polish pack.

phew!

Saturday, June 1, 2013

Reddit Challenge - Inspired by a Pattern

My "inspired by a pattern" manicure was actually inspired by a game!

My gaming group is just starting a Pathfinder game set in Ancient Greece, so I thought, why not do a Greek Key pattern on my nails.

087 Greek Key 52R

2 coats of Sinful Colors White on White - I finally switched over to my new white. My Zoya one is getting a bit thick, and it's also an off-white, so I didn't think it would work as well with this one, especially since I was going to be using a white detail polish.

On my ring finger, I did one coat of It's So Easy Stripe Rite polish in blue.

For the white nails, I used the same striper polish to add the design
On the blue nail, I used my Claire's white striper polish.
I also used these for corrections where needed. Unfortunately, the Clair's polish has a single long hair that sticks out and I couldn't find my nail scissors to trim it down, so it was a bit messy. I'll have to fix that before I try another really detailed manicure.

I think it came out pretty well.

Thursday, May 23, 2013

Reddit Challenge - Pastel

I bought some nail studs, so I wanted to do something with them, and came up with this little pattern:

086 Pastel Studs 52R

I think it looks a little bit art deco -ish

Anyways, the colours I used were
1 coat of Zoya White (to create a base for the pastel)
2 coats of a miscellaneous pale aqua colour from an 'ombre' set I bought (I'll show the set at a later date)
1 coat of Essence Black is Back, applied with a nail art brush

I pressed in the studs while the polish was still soft, and then I topped it all off with a clear topcoat.

The first stud fell off after around 24 hours (and chores), and I picked the rest off the following day.

It was fun while it lasted!

Saturday, May 18, 2013

Reddit Challenge - Text

I knew this one would be a stamping challenge, because I didn't want to do another newspaper manicure just yet.

Blue &

I used 1 coat of Sinful Colors Rain Storm - I really love this blue. It's got a slight grey tone to it, and the polish is perfect in a single coat.

I used my Zoya white and Bundle Monster plate BM-311 to add the ampersands.
BM-311 has stamping images with numbers, a love letter, "love" written in different fonts and then the ampersands. I figured having little &&&& all over my fingers would be cute.

Next week's challenge is Pastel.
I've been a bit tardy with my posts lately, but that's mostly because work has been wearing me out and we've barely been home. I've always had something on my nails, but haven't had a chance to get nice photos of the manicures.

Thursday, May 9, 2013

Reddit Challenge - Yellow

Ok, something simple this week.
I actually have several yellow polishes. This is a bit surprising, because I really am not a big fan of yellow.
They're all different too - pastel creme, scented bright yellow creme, sheer super shimmery yellow and opaque slightly shimmery yellow.

084 Yellow 52R

I used my opaque, slightly shimmery yellow for this one - Essence Wanna Be Your Sunshine
Since yellows can be difficult to apply, I started with a coat of Zoya White. After the white was dry, I applied a generous coat of the Essence polish. I really like this one. I probably could have gone with two coats, but one worked.

After the yellow was dry, I topped it off with a coat of China Glaze Whirled Away.
One of the many popular multi-sized black and white matte glitters ("matte glitter meaning it's not metallic - it's still shiny though ...)

I had a bit of an issue with this one. It might have been that I put on Whirled Away too thick, or I put on Out The Door (quick dry topcoat) before everything was dry enough, but I got bubbles. You can see them in the photo.

When I removed the manicure, You could really tell it went all the way through the polish!

084 Yellow Removal 52R

The rest of the manicure came off really easily with the foil method.

Monday, April 29, 2013

Reddit Challenge - Inspired by Food

I was sorting through ideas for food related manicures, and settled on watermelon.
This is another super easy and cute manicure you can do.

083 Watermelon 52R

1 coat Wet n Wild Lavender.
1 coat Sally Hansen HD Digital - Like the other Sally Hansen HD polishes, this is a sheer shimmery polish. Digital is a hot pink.

1 coat Color Club Green Scene for the french tip - this is a very pretty bright minty green. I got a mini bottle on clearance at a beauty supply store.

Seeds were added using Essence Black is Back and the small end of the Essence dotting tool.
I know I said way at the beginning that I didn't want to spend the money on dotting tools, but at $2.50, I figured I would give this one a try. It's not bad. I still say you can get the same effect with other tools, but it does what it's supposed to (I actually used it for painting something not-nail-related before I used it on my nails.)

My friend actually did a watermelon manicure as well - we were talking about the next thing we wanted to do, and we both said watermelon! The green on hers is up the side of her nail - super cute!

Next week's theme is Yellow. I'm going to go with something pretty simple.

Friday, April 26, 2013

Time And Relative Dimension In Space

Before Christmas, I decided that I was going to finally sit down and teach myself how to knit, so I could make a Doctor Who scarf (4th Doctor, Tom Baker).
Fan Expo also came back to Vancouver for it's second year last weekend, and I decided I wanted to try and finish the scarf in time for the convention. To make it even more fun, I figured that I should keep an eye out in my travels for other pieces to make a Femme 4th Doctor costume.

Well, I managed to finish everything and find the costume pieces just in the nick of time, and I couldn't just go with any old manicure ...

079 Tardis

Ardene Elektronika - two coats on each nail.

China Glaze Cosmic Dust - two coats on top of the blue. Yep, I finally managed to track down some holographic polish. I absolutely love it. I grabbed this one (silver) and Galactic Grey (gunmetal). New favourite polishes. The holographic effect is strongest in bright sunlight, but you can still get a bit of a shine under artificial lighting. Neither is completely in your face holographic like some of the other polishes out there, but it's definitely there. This one also doesn't seem to dull under topcoat, as I've read about other holographic polishes (it does at first, but once the topcoat is dry, you're good to go).
Someone described it as appropriately 'wibbly wobbly'.

To create the tardis, I just used my striping polishes in white, black and metallic blue. I wasn't originally intending on using the blue, but I felt the nails needed a little more definition.

Also ... one of the dealers had a Tardis set up for photo ops, so ... I just had to.

4th Doctor

Wednesday, April 24, 2013

Revlon Selects - Polish Box

Alright, so I shared with you last week that I received a surprise box of nail goodies from Revlon as part of the Revlon Selects program. I'm going to be featuring the two polishes I received in today's post.

If you would like the opportunity to take part in the Revlon Selects program, they offer opportunities on their Revlon Canada Facebook page every once in a while, so check it out!
If you're not in Canada, take a look at your local Revlon page on Facebook - they may have similar product sample offers.


First up, Revlon Colorstay in Nude Beige.
Sheer coverage with one coat, and opaque coverage in two. Easy to apply, smooth and super shiny (photo has no topcoat).
The colour? Definitely nude! I've seen other nail bloggers refer to this look as 'mannequin hands'. It's kinda neat! I think I will have to try this shade again with some black or white stamping over top.
Nude polishes seem to be in for spring, so this is perfect timing for Revlon to release this new shade.

080 Revlon Nude Beige


Next up is from the new limited Chroma Chameleon line. This is a line of duochrome or colour shifting polishes. I couldn't find anything official from Revlon (they aren't on their site yet), so here is a link to Nouveau Cheap's post with some photos of the collection.
I ended up with "Gold" which has a gold-green colour shift. I don't own Chanel's Peridot, but from what I've seen, this will be another dupe.

I was a little afraid when I started applying this one because of just how sheer it was on the first coat, however it built up pretty quickly and I only needed three coats in the end. You will end up with some brushstrokes, but they don't stand out too much.

It was a little difficult to photograph this one in my dark house in cloudy Vancouver (I really need a light box), so I took one photo with the flash and another photo in the dull afternoon sun.
The duochrome is pretty strong on this one in real life. I would recommend it if you missed out on any of the other versions of this shade. It looks like they have some other really nice duochromes in the line as well.

081a Revlon Chroma Chamelion Gold

081b Revlon Chroma Chamelion Gold


And finally, (mostly) naked nails!
This one was NOT provided to me by Revlon, but it is their product ...
I quickly swatched the polishes above with no basecoat or topcoat  on Wednesday and then decided to hold off doing a full manicure for a couple of days, because I wanted to do something for a comic convention I was going to over the weekend. The first day, I had nothing on my nails at all and it actually felt weird, so when I got home, I applied my Revlon Calcium Gel Nail Hardener.
I use this once in a while, because it doesn't really work as a basecoat (I always end up with lots of bubbles), but if ever I want bare nails, it is my go-to clear coat.
I figured since my nails were in decent condition, I would share!

082 Naked Nails

I get a tiny amount of discolouration toward the tips of my nails, but using a basecoat every time really helps to prevent staining or yellowing.

In a couple more days, I will share the manicure I wore to Fan Expo Vancouver, and I am going to test out the nail strips that came in my Revlon Selects package in the next few weeks.


**disclamer**
The first two products featured in this post were provided to me free of charge to test and review based on a contest I entered last year. I do not receive any additional compensation for reviewing the products, nor do I allow free product samples to influence my opinions of the product itself.

Monday, April 22, 2013

Reddit Challenge - Animal Print

I grabbed another clearance polish a while back, this time from a salon. China Glaze Desert Sun. It's a lovely light orange-brown shade.

When I saw an Animal Print challenge was coming up, I knew I wanted to do freehand leopard print, because I had never done it before.

I also didn't just want to do plain leopard print.
I liked this tutorial, but didn't want to recreate it exactly, so I improvised and modified.


078 Leopard Ruffian 52R

First, I started with two coats of Desert Sun near my cuticles. I didn't do my whole nail with it, because I didn't want to wait for too many layers to dry.

Then, I went over it with two coats of Essence Nude It!, leaving the Desert Sun visible to create a ruffian.

Once that was dry, I used Desert Sun to create little blobby dots all over the Nude It!.

Finally, I used  It's So Easy Stripe Rite Black to finish off the leopard print.

Normally, I'm not a big fan of animal prints, but I really like how this one came out!

Wednesday, April 17, 2013

Revlon Selects News and Wild Child

First up -
As you may know, I was selected as one of 500 people to receive a box of goodies for review under the Revlon Selects program.
Now, when I entered the contest on facebook, figured it was a one time thing and thought, it would be cool if they sent more stuff later, but never really expected anything else.
Well, yesterday I got a lovely surprise in my mailbox - a square box with a Revlon Selects sticker pasted on the side. I opened it up and much to my delight were two full size bottles of nail polish and a box of nail strips. Apparently they selected a group of people at random from the first batch of 500 and sent out another box.

Selects take 2

I got a bottle of Revlon Colorstay polish in "Nude Beige", new Revlon Chroma Chameleon polish in "Gold" (a very popular green-gold duochrome shade) and a box of Revlon 3D Jewel Appliques in "Floral Fatale" (hot pink, white and black floral design with a silver geometric pattern. - they're a bit textured, hence the "3D")

Stay tuned for some photos of the products in action!


In other news ... A manicure!

I found this one on clearance at my local Shopper's Drug Mart and decided I wanted to get it.

077 Wild Child

It was really hard to get a photo of this one that shows all of it's elements.

The base is a black jelly polish filled with gold micro glitter.
Then, it has tiny silver holo hex glitter. In the bottle I have, this was all settled at the bottom and I had to turn the bottle upside-down and shake like mad to get it blended in at all.
Finally, it has a light scattering of small hex glitter in orange, teal, lime green, gold, purple, blue ... there might be other colours, but I'm not sure.

Since it's a jelly and I didn't want to use too many coats and muddy up the glitter, I did a base coat of Avon Licorice - a black creme - to provide a base, before adding a couple of coats of Wild Child.

The coloured glitter was a bit difficult to get out of the bottle, you'll see I only have one on my pinky and two -3 pieces on my other fingers. My thumb got 5 total. But it's enough as long as you shake the bottle before each coat. I checked out google images to see if I could find any other pictures of it, and you couldn't really see the coloured glitter in any of them.
Too bad, because this is a gorgeous polish, but since it was on clearance, I assume it has been discontinued.

Saturday, April 13, 2013

Two Weeks of Reddit Challenges

I'm on a deadline for a couple of craft projects so it's difficult to fit fancy nail art in as well.
Sorry I've been a bit behind!

Also, I wanted to share that my favourite nail blogger (and fellow Canadian) Kayla Shevonne is doing a nail polish giveaway sponsored by Butter London Canada. Today is the last day - go enter!
**** Giveaway ****

This post has two weeks worth of challenges in it, just so I can focus on getting my other projects done.


First up, this last week's challenge was "Inspired by a Flag"
I chose the Union Flag (or Union Jack), but I also wanted to show what flags were used to create the Union Flag ...
It's a little wobbly because it was all done freehand with normal sized nail polish brushes. I really need to get a striper brush.

075 UK Flags 52R

Thumb: Union Flag

Index: Flag of England - St. George's Cross

Middle: Flag of Scotland - St. Andrew's Cross (sorry, I didn't have an appropriate blue, it's supposed to be an azure blue background)

Ring: St. Patrick's Cross. From what I understand, this one is frequently used by the government to represent Northern Ireland. Check out Wikipedia for some information on Flag disputes in Northern Ireland.

I just used the blue on my pinky to tie everything together.

Colours Used:
Blue - Ardene Elektronika
White - Zoya (colour unknown)
Red - Essence Flame Fatal


This coming week's manicure is "Flowers"

I settled on daisies.

076 Daisies 52R

Two coats of Essence Wake Up!
Then I used my Claire's white detail polish to create the daisy and added a dot of  Essence Wanna Be Your Sunshine for the centres.

Friday, April 5, 2013

Reddit Challenge - Grey

This weeks's challenge was pretty open: Grey

I decided to keep it simple and subtle.

074 Grey French

2 coats of Avon Concrete (matte polish)
French tips done in Color Club Wild Orchid
I used a top coat to make it shiny, because I didn't like the matte for this manicure.

I love how well the colours matched. Wild Orchid does have a slight purple shine to it in some light, but for the most part, this was a very, very subtle french tip.

Next week's challenge is Inspired by a Flag. I had such a hard time with this one last time I did it, but I think I have something in mind this time.