Saturday, December 29, 2012

Nude and Neon Outline Manicure

Page makeover! Well, new background at least.


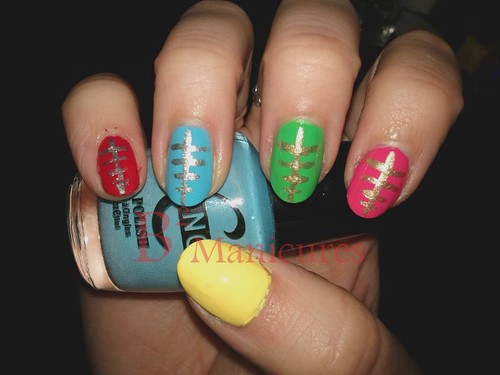
When I saw this manicure over on Fab Fatale, I wanted to try it out, but I actually didn't have a nude polish until I got one for Christmas! I added a bit of stamping, because I really wanted to use my new plates.

My nails are sooooo short! I mucked them up while manhandling a still partially frozen turkey on Boxing Day morning - dealing with ice and washing your hands every 5 minutes is not kind to nails.

053 Nude Neon Outline

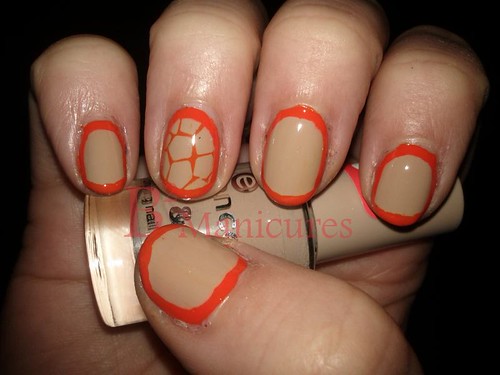
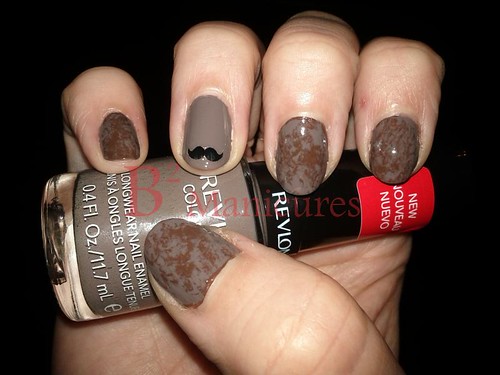
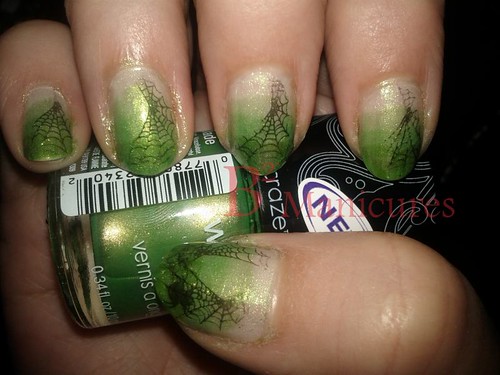
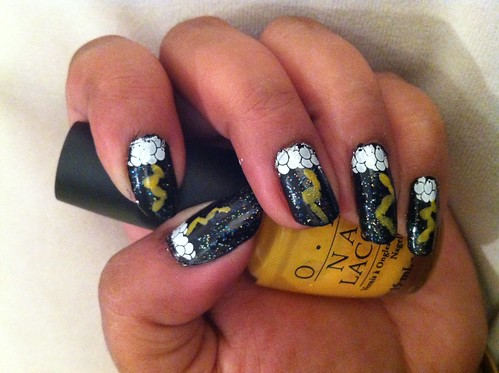
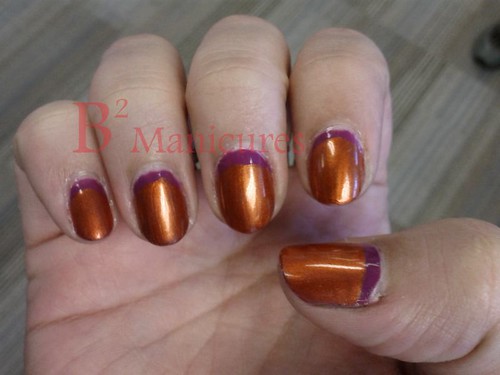
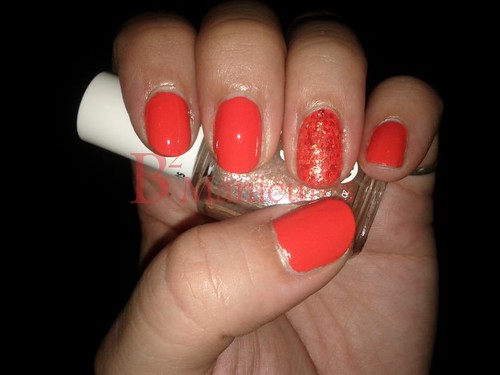
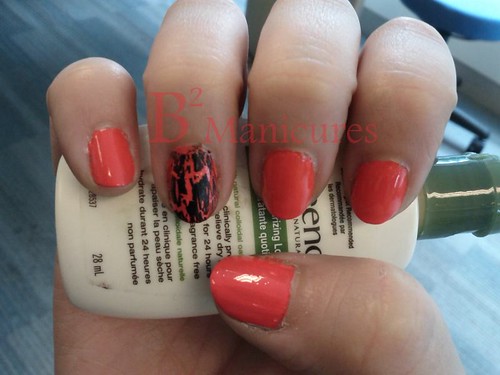
2 coats of Essence Wake Up! - this is an incredibly bright traffic cone orange. I love it!

After that was dry, I went over it with 2 coats of Essence Nude It!, leaving some orange around the top and sides.This isn't a "mannequin hands" nude for me, but it goes really well with my skin tone.

After that was dry, I went back in with Wake Up! and Bundle Monster plate BM-313 to add a fun effect to my ring finger. It actually looks like a turtle shell! I have an idea forming for a future manicure ...

Finally, I used Wake Up! to finish off the tips and clean up anywhere that I really mucked up the sides.

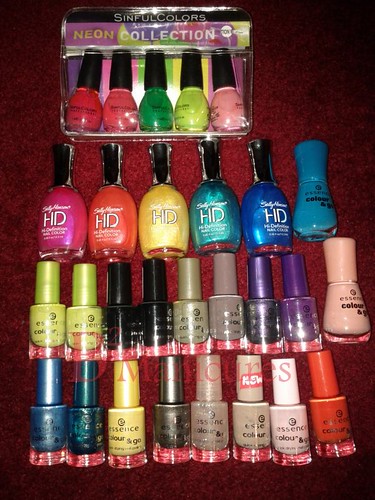
Essence's formula is really nice for an inexpensive polish. Shoppers Drug Mart carries the new line for $1.99, the old line (which these are) was a slightly smaller bottle for $1.49. I recommended it to a friend, and she loved it. A girl came up to me at work the other day raving about it as well.
There isn't a huge selection of colours, but there are some real gems in both lines.


Now, to figure out what to do on my nails for New Years Eve!

Friday, December 28, 2012

Reddit Challenge - Red

I must have tried 3 or 4 times to get a good red manicure.
I really don't like red polish all that much.

052 Red 52R

I went with 2 coats of Avon Ruby Slippers (red jelly with tiny silver glitter in it.  It's really ugly in the bottle, but gorgeous on the nail. Only problem is, it takes a million years to dry.

I wanted to be a bit Christmassy, so I added a feature nail with Zoya Envy - a deep pine green - and finished it off with a matte topcoat.

The green is almost too dark, but I still like it.

The next challenge is New Years - I have some ideas, but we'll see what happens!
I will have a different manicure to post between now and then, provided it turns out - haha!

Thursday, December 27, 2012

Christmas Haul

So, of course I asked for nail polish for Christmas ... here's what I got:

My sister-in law bought me:
It's So Easy Stripe Rite polishes in turquoise, blue, black and hot pink
Nail Bliss spiderweb nail stickers
Cina nail art pen in white

Christmas SIL

I did this manicure while we were opening presents:

Christmas Morning 2012


My mom bought me a ton of polish - I asked her for the whole Essence collection (since it's pretty inexpensive). She wasn't able to find many of the new ones - I guess her Shopper's got all the old stock - but she bought me all of the old ones she could find, plus more!

Christmas Mom

Essence new collection:
110 Modern Romance (shimmery peach)
128 Let's Get Lost (bright blue)

Essence old collection:
04 Space Queen (iridescent glitter)
05 Sweet as Candy (sheer pink)
26 Break Through (purple with a slight hint of gold shimmer)
34 Walk of Fame (purple-brown-grey)
38 Choose Me! (teal glitter)
39 Lime Up (x2)
43 Where is the Party? (purple/green duochrome)
46 Wake Up! (traffic cone orange)
59 Black is Back (x2)
68 High Spirits (olive green / gold)
70 Nude It (brownish nude)
75 Gleam in Blue (shimmery light blue)
83 Luxury Secret (pewter?)
95 Wanna Be Your Sunshine (shimmery yellow)

Sally Hansen HD polishes (just the shimmery ones, not the duochromes):
Digital (hot pink)
Blu (um ... blue)
Pixel Pretty (turquoise)
Three D (orange)
Lite (yellow)

Sinful Colors neon mini polish collection, which comes with Dream On (fuchsia) Pink (derp), Irish Green, Neon Melon (surprisingly, yellow) and Fusion Neon (a bubblegum pink)


My husband bought me the Bundle Monster stamping plates 2012 Collection.
I didn't take a photo, but he even tagged the package "To: B2" haha!
I'm just trying to figure out which image to use for my nails right now.

Saturday, December 22, 2012

Party Nails

I don't normally wear dresses, so I have to buy one pretty much every year for company Christmas parties.
This year, I wanted to make my nails match.

The dress I got was black with metallic black polkadots - so my plan was to go with matte black nails and shiny drops on top, but it really didn't work out the way I had hoped.
Then I tried shiny french tips, which I am still terrible at freehanding, especially when I'm in a rush.

I finally settled on matte black with a feature nail of shiny black with fine silver glitter.

051 Party Black

1 coat Avon Licorice on every finger except my ring finger, topped off with GOSH matte topcoat.

1 coat of ORLY Goth on each ring finger finished off with a normal topcoat.

Subtle, but it went very well with the dress!

Wednesday, December 19, 2012

Reddit Challenge - Inspired by a Song

I had a really tough time with this one, and I asked people for help.

I asked my husband first. At the time, I was painting my nails black for my company Christmas party, and he just looked at my nails, looked back at me and raised his eyebrows. "Paint it Black" ... I really didn't want to cop-out, but I kept it in my back pocket.

I asked a co-worker. "99 Red Balloons", he suggested and gave me a link to a website with a list of songs that have colours in the title. Very crafty!

I browsed the site and thought "Yellow Submarine!" but since I'm going to be taking it off quickly to do a manicure for another Christmas party, I didn't want to put a lot of time into it.

I started typing in bands, looking for lists of songs, I finally went back to The Beatles, and figured why not just go for their costumes for Sgt. Pepper's Lonely Hearts Club Band.

So ... here it is!

050 Sgt Pepper 52R

Thumb is 3 coats Claire's Scented Banana
Index finger is 2 coats Wet n Wild Lavender
Middle finger is 3 coats Claire's Scented Lime
Ring finger is 2 coats Fascino Blue
Pinkie is 2 coats Wet n Wild Red

Details are done with Claire's and Icing detail polishes in gold and silver.

Fast and cute!

Monday, December 17, 2012

Glitter Polish and Revlon Selects

First up - my first Revlon Selects review!

I received Revlon's ColorStay Ultimate Suede Lipstick in Backstage - a burgundy shade.
I was happy to receive this colour - It's probably the one I would have bought.

Ultimate Suede

Packaging: The lid is secure and the tube clicks a couple of times when twisting it. I've had a few lipsticks in the past that have popped open in my purse (yuck!) and some that have twisted up and smooshed in the lid, so I'm a fan of both of these features.
I store my lipstick upright in a box, so the clear lid is handy.

The lipstick applied very nicely - smooth and not quite sheer. I was a little worried that I would have to keep reapplying it all night.
After a few minutes, the lipstick set. Some longwear lipsticks dry out so much that you have to keep applying lip balm to prevent your lips from cracking. The Ultimate Suede was a bit dry, but I didn't feel like I had to do anything extra.

I wore it to my company Christmas party and am happy to say that it lasted through the entire night. I think I had it on for about 8 hours (through dinner, drinking, etc).
When I got home and wanted to remove it, I had some lip balm ready to soften it, but wanted to try just a tissue first. I was very surprised when it all came off with just a couple of swipes.

I think this is going to be my go-to lipstick from now on!

Unfortunately, I didn't take any after photos (I was too sleepy to think of it), but I've got another party on Friday, so I'll try to remember then.


 Now for the nail polish!

Reddit challenge this week was "Glitter"
I decided that I was going to try the white glue basecoat to see how well it works for removal.

049 Glitter 52R

Some people put the glue in an old cleaned polish bottle, but I just put some onto a piece of scrap cardboard and painted it onto my nails with a brush. Once it was dry, I added my base colour - OPI Black Onyx - and my glitter - one coat of Wet n' Wild Rest in Pieces.
I really like this polish. I've seen a lot of reviewers put on multiple coats, so you end up with this sort of grey-red mess, but I think one coat over black shows how pretty this one is.

The glue removal method? I'll do it again! It worked so well - just peel the polish off from the cuticle and wash your hands well to remove any residue.

I only did my thumb, because I had to do my nails for my company Christmas party, and I didn't want to do a whole manicure just to take it off.
I'll share that manicure a little later - I've got another challenge and another party - so many manicures!

The next challenge is "Inspired by a Song"

Wednesday, December 12, 2012

Revlon Selects has Arrived!

I got home today, and a small box was sitting on my table with a Revlon Selects label!
My husband said that the mail man had crammed it in our mailbox - it's bigger than our mailbox, so it was a little dented, but everything made it in one piece!

Box Opening

Included in the box is:
Revlon PhotoReady Primer+Shadow in Metropolitan - lovely brown/taupe/gold eyeshadow shades
Revlon ColorStay Ultimate Suede Lipstick in Backstage - a shimmery wine shade
Revlon Nail Art Expressionist polish in Vincent Van Gold - shimmery purple and gold polishes
Revlon Nail Art Moon Candy in Orbit - dark purple creme and blue-green flakies in a clear purple base
Revlon Diamond Collection Nail File (I got a purple one!)

I look forward to testing these all out and posting my reviews.

I'm going to wear the eyeshadow to work tomorrow just for fun.

Thursday, December 6, 2012

Reddit Challenge - Winter Nails

I had a really pretty blue to white gradient in mind, and wanted to try a sponge gradient. Problem is, the colours I chose were all way too sheer, so I had to improvise.

048 Winter 52R

I started with two coats of Zoya White to create a solid base.

Working one finger at a time, I dabbed on some NYC Turquoise Seas at the cuticle, then dabbed some of it off with a sponge. I bought this polish so many years ago when I had turquoise in my hair, and a lot of turquoise in my wardrobe. It's a really pretty shimmery sheer turquoise.
I added some Sinful Colors Cinderella in the middle. I am still in love with this blue. I keep looking for more, because I'd love to have a backup bottle.
Then I finished the gradient by dabbing on some Sally Hansen Polar Bare, a white jelly polish.

While the polish was still a bit sticky, I added a coat of Wet n Wild Hallucinate - iridescent glitter - to help blend it even more.

I like the icy look of this manicure.

Next week is glitter ...
I found out that some people are using white glue as a basecoat when dealing with glitter polishes - it sort of turns it into a peel off nail polish. I think I'll give it a shot!

Saturday, December 1, 2012

Rainy Saturday Nails

I've wanted to try a cloud manicure for a while, and I figured that today would be a good day to do it.

Here is a tutorial - it's super easy!

047 Rainy Saturday

I started with two coats of OPI Black Onyx. I need more of this. It's the best black I've ever had.

One coat of Mark. Trend Industrial - this is from a set of two mini polishes, the other is a faded purple. I'm not a big fan of these polishes, I've tried using them once before and they took forever to dry. I love the colour though.

One coat of Avon Matte Concrete. I used this one before for the Spun Sugar manicure. It's a bit thick, but otherwise, I really like it.

On top of the Concrete, I did a coat of Wet n Wild Hallucinate, an iridescent glitter.

I really like the way it came out.

Friday, November 30, 2012

Revlon Selects

Last week, I entered a contest put on by Revlon Canada on Facebook - it gave 500 people the chance to win products for review.
I didn't think I'd get selected, because I've never really won anything before, but it doesn't hurt to try.

I came home from work today ready to relax after a hectic week; opened up my email and ...

Revlon Selects

Once I get the package, I will do separate reviews for each product. You're going to get to see something other than my nails for once - hah!

I'm super excited.

Oh yeah ... I created a facebook page and finally started using my twitter account - check the links on the right.

Wednesday, November 28, 2012

Reddit Challenge - Rainbow

I've wanted to do a rainbow water marble for a while, so I thought this was the perfect opportunity.
Except, I didn't want to do it on every finger. I thought, why not do water marble tips?

A few tries and lots of nail polish remover later ...

046 Rainbow Marble 52R

2 coats OPI Black Onyx on each finger, except my ring finger. Then I taped off the tip and painted on a coat of Zoya White.
2 coats Zoya White on my ring finger.

Water marble: 
1 drop Zoya White, 
1 drop Wet'n'Wild Red, 
1 drop Sally Hansen Sun Kissed
1 drop Sally Hansen Mellow Yellow
1 drop Claire's Scented Lime
1 drop Ardene's Electrified
1 drop Essence Break Through

Swirl and dip!

For my ring fingers, I taped off around the edge of my nail to help cleanup and dipped the whole thing.

While my other fingers were still taped from the white, I dipped them 2 fingers at a time (to save time and polish). I did my index and middle finger, then my thumb and pinkie. 
I did not wrap the tape all the way around, so there was a LOT of clean up on those ones.
The photo shows some spots that I missed on cleanup - darn it - there was nail polish all over my hands.

I think it looks really neat! I don't think I'd do it again with that many colours, but if I was to do a water marble with 3 or 4 colours, just doing the tips would work really well.

Monday, November 19, 2012

52 Week Challenge - Movember Marble

The I'm Simply Complex challenge this week is "Movember". It was originally supposed to be a Thanksgiving Manicure, but being Canadian, I chose to do that one earlier (and a little non-traditional!).

The Reddit challenge this week is Plastic Wrap.

I'm combining them again this week.

I wanted the colours to be a bit more subdued this week. Brights are fun and all, but I like greys and earth tones.

045 Movember Marble 52R

I started with two coats of Revlon Chocolate Truffle on each nail, except my ring finger. Such a pretty brown - it definitely looks like I coated my nails in chocolate.
My Ring Finger got two coats of Revlon Stormy Night - a lovely grey with purple/brown tones.

Once that was all dry, I did the plastic wrap challenge ...
I prepped by tearing off a small strip of plastic wrap and chopping it up into 8 smaller pieces, which I then scrunched up and set aside.
Working one finger at a time, I added a coat of Stormy Night over top of the Chocolate Truffle, grabbed a plastic wrap ball and dabbed it on my nail to pull off the wet polish.
It ends up looking really messy and textured, but a good topcoat smooths it right out and you're left with zero-effort marbled look!

For the Movember challenge, I used nail decals that I got ages ago. They're pink and black mustaches in various styles and sizes. I chose some black ones and stuck them on the tips of my nails. Added topcoat to seal it down and done.

I have no idea where I got that cut on my index finger - the only thing I can think of is that I've been teaching myself how to knit, and I may have given myself a friction burn or something from holding / wrapping the yarn. Also holy dry cuticles Batman! My skin always gets super dry in the winter and I've been having bad hangnails lately. My regular moisturizing routine just isn't cutting it.

Next week's challenges are Rainbow and Feather ... I have to go find some feathers!!

Tuesday, November 13, 2012

Reddit Challenge - Black and White

I was wrong, Movember manicure is next week. :)
I was supposed to do a Remembrance day manicure, but to be honest, I didn't do anything on the 11th, let alone paint my nails. And now the moment has passed, so I'm not doing that one this time. Maybe next year?

So, black and white.
I wanted to do stamping, so I found an image that I thought would go well with the theme - houndstooth.

044 Houndstooth 52R

2 coats of Zoya White
Houndstooth from Cheeky stamping plate CH08 - stamped on with OPI Black.
1 coat of Sally Hansen Polar Bare over top.

The pattern smudged a bit, but I think it still looks pretty.

So ... next week is Movember (I promise) and the Reddit challenge is Saran Wrap.

Monday, November 5, 2012

Reddit Challenge - Earthbound

The theme this week was "Inspired by a Game"
I've been playing Earthbound lately, so I figured it might be fun to feature the four main characters.

Ness, Paula, Jeff and Poo ... (I guess that's sort of backwards, Ness is on my index finger)
I didn't think I could do their whole bodies, so I went with just their faces. I think Ness came out the best (too bad there's a shine on his mouth)

043 Earthbound 52R

Image of the gang for reference:


I did a water marble on  my thumb, because in the game all of the battle backgrounds are weird psychedelic swirly things:

(imagine that animated)

Colours used:
Claire's Scented Lime (for the background - say 'fuzzy pickles'!)
Zoya White (to block out the face shapes and for Jeff's glasses)
Essence Modern Romance (nude with shimmer - for the skin)
Claire's Scented Banana (for Paula and Jeff's hair and the water marble)
QUO by ORLY Instant Artist Black (for the outlines and black details)
Wet n Wild Fantasy Makers Red (Ness's cap and the water marble)
Claire's Jazz (blue, for the bill of Ness's cap)
Wet n Wild Lavender (for Paula's bow and the water marble)
Sally Hansen Sun Kissed (for the water marble)

phew!
I only actually did my right hand ... I didn't have the patience to do a lumpy mess on my left hand, so it's just solid green.

The other challenge this week is Tribal ... but I think I can only do one fancy pants manicure in a week, so click here to see my last tribal one.

Next week is black and white for Reddit and Movember for the other challenge. hmm.

Thursday, November 1, 2012

52 Week / Reddit Challenge - Candy Corn

I combined the challenges again this week - Reddit was "orange" and I'm Simply Complex was "Halloween"

042 Candy Corn 52R

My index and ring fingers are two coats of Zoya White, then I added a coat of Sally Hansen Sun Kissed and finally Sally Hansen Mellow Yellow on the tips. My favourite Halloween treat - Candy Corn!

My thumb, middle finger and pinkie are a coat each of OPI Black Onyx, Joe Twilight (black with flakies - it's a little sheer, which is why I did the OPI first, but it was an awesome find at Superstore!), and finally Essie Shine of the Times (clear base with flakies). I love the green-orange colour shift.

Once that was all done, I added my GOSH Matte topcoat.
This is another one where I was in a rush, so I wasn't able to clean it up - I did it last minute before I had to start prepping for trick-or-treaters!

Thursday, October 25, 2012

52 Week Challenges - Slime and Spiderwebs

The Reddit challenge this week is Gradient or Ombre.
The I'm Simply Complex challenge is Spiderwebs.

It's the week before Halloween, so I figured why not combine the two challenges?
I didn't do any cleanup on this one, because by the time I was finally finished, I was so frustrated with it, I just wanted to take the pictures and be done with it all.
I had to do it several times - due to bumps, colours not working properly together ... you name it - ugh.
I do love the manicure though!

041 Slime and Spider 52R

For the Gradient portion, I decided to do a green syrup manicure.
I started with a coat of Wet n Wild Jade covering 3/4 of my nails.
I added a second coat about half-way down.
For the tip, I didn't think another coat of Jade would do it, so I used Sinful Colors Show Me The Way.
To blend it all together, I went over it with OPI Firefly
Then, to give it that extra Halloween "oomph" I used Wet n Wild's Glow in the Dark topcoat.

Once that was thoroughly dry, I stamped on a spiderweb using Bundle Monster plate BM13 and OPI Black Onyx.
I added a spider from the same plate on my thumb.

Saturday, October 20, 2012

Reddit Challenge - Inspired by Reddit

I've actually only been on the nail polish board on Reddit, so this was a bit tough. I was going to go with the main colours of Reddit (blue orange white) and do something with that, maybe draw the alien.

Then, I volunteered to help someone out by taking a series of photographs of how I do my nails, step-by-step, including any sketches or inspriation.
Well, I figured this was good enough - it was a manicure I've been meaning to do, and had a sketch of (I never do that), but just never got around to it.
Reddit inspired me to go for it.

040 Tribal 52R

On my thumb and ring finger, 1 coat of OPI Black Onyx

Other fingers 2 coats of ORLY Rock The World - I really like this one, it's a wine colour with gold shimmer.

Then comes the detail ... using my Claire's white detail polish, I painted blocks and stripes on my thumb and ring finger, and large french tips on my other fingers.

I painted over most of the white with Clare's Scented Banana and ORLY Rock The world. Then I used QUO by ORLY Instant Artist Black and Claire's White detail polishes to clean up the design.

The design is actually inspired by something - a dress I think? I haven't been able to find it since I did the original sketch.

It was a lot of work, but it turned out well!
There are several layers in some spots, so I'm not sure how long it will be until this chips.

Sunday, October 14, 2012

52 Week Challenge - Pink Sugar

This week's theme is pink / breast cancer awareness.
I wanted to try out sugar spun nails (youtube tutorial), so I picked a base colour and two shades of pink and went at it.

039 Pink Sugar 52R

I started off with one coat of Avon Matte Concrete.
For the texture I went with Wet n Wild Lavender (I have no idea why this one is named lavender ... this is lavender, the nail polish is more of a deep pink) and Sally Hansen Pink Blink.

If you don't want to watch the tutorial, all you really have to do to achieve this look is put a few drops of nail polish onto a palette, then stir and pull at it with a toothpick until it is thick enough so that when you dip the toothpick in and pull it out it creates a string - just pull that string over your nail and keep going until you're happy with it.
It does require quite a bit of cleanup - taping around the edges of your nail would probably help.

My nails are very rounded, so it was difficult to place the strings near the edges, but I think it looks funky mostly in the middle of my nail.

I did use a topcoat on this one, but I had to paint it on my nail sideways - it was too thick to cover behind the ridges. I actually liked it way better without the topcoat. Oh well, next time.

Later this week, I'll be doing the Reddit challenge - "Inspired by Reddit"

Thursday, October 11, 2012

Reddit 52 - Blue Marble

This week's Reddit theme is Blue!

As previously mentioned, Sinful Colors Cinderella makes a reappearance here. I really do like this colour.

038 Blue Marble 52R

I started with my cheapie Fascino #047 pale blue creme - one coat on each finger.

Then, I taped off my ring finger and did a water marble using #47, Cinderella, Sally Hansen HD Lazer (blue/purple duochrome), Claire's Jazz (medium blue jelly with blue sparkle), Color Club Blue-Topia (deep, dark blue jelly) - I dotted the colours into the water randomly then swirled and dipped. I ended up with large waves on both hands rather than swirls, but I really like it.

On all my other fingers, I added two coats of Cinderella.

Pretty Blue!

Check out this link to see what others did with the Blue theme

Monday, October 8, 2012

52 Week Challenge - Animal Print and Thanksgiving

Two challenges here... both from the old 52 Week Challenge


When my friend and I split a couple of orders of stamping plates, I let her have all the animal print ones, because I'm not a huge fan, but I ended up with a zebra print stamp.

036 Zebra 52

2 coats Zoya off-white
1 coat Sally Hansen Polar Bare

OPI Black Onyx used to stamp on the zebra print from Bundle Monster plate BM16

It was a little too plain, so I went in with Wet n Wild Lavender Creme (bright pink) and added a french tip.


My husband's family celebrates Thanksgiving a little differently - they do hamburgers (not turkey burgers and thanksgiving fixings ... real hamburgers with all the fixings). It makes for a fun, relaxed Thanksgiving.
This year, his parents were in Africa, so we volunteered to host his sister and her family for dinner. It was a LOT of fun.

So, in honour of our strange Thanksgiving ... I did a hamburger feature nail.

037 Hamburger 52

I "cheated" and used acrylic paint because I don't have a tan nail polish.

I finally managed to get my hands on a bottle of Sinful Colors Cinderella - it's a gorgeous pale blue jelly with a pink/gold iridescent shimmer. So. Pretty. I think that this is one where, if I spot another bottle, I will buy it.
I decided to use it for this manicure, and it will be making a reappearance later this week for the Reddit Challenge Theme

Thursday, October 4, 2012

Reddit Challenge - Autumn Taping

For the first week of the Reddit 52 week challenge, the theme is taping - my previous tape manicure is here.

I wanted to try the alternate version of the patchwork manicure I found - it's taping off angled sections of your nail. (using this tutorial from Chloe's Nails Blog).

035 Taping 52R

I knew I wanted to use NYC Pumpkin, because it's my favourite orange and it's October.
A friend gave me a lovely bottle of polish last night - Sally Hansen Chestnut. It's a deep red-brown shimmer.
I grabbed my Wet n Wild Rustic to complete the trio.

I love how well the colours go together.

Still working on my cleanup technique - I need a better brush, and I think I should change away from the acetone free remover.

Monday, October 1, 2012

Guest Manicure - Stormy!

This is a super busy week - I'm going to fall behind on my weekly challenge (I have two now - check out the links in the sidebar)

Anyways, to help me out, one of my friends, Manpreet, did a very pretty stormy manicure for my blog!

Without further ado ...

guest mani M

The base is a Sally Hansen black polish, the clouds were done using a Konad stamp (the stamp is actually cranberries), the lightning bolt was free-hand using a yellow OPI polish and the rain was done using an iridescent Wet n Wild glitter polish.

Love it Manpreet!


In other news ... Here is how the nail strips turned out after a week - not bad! Just nail growth and some tip wear. I could have worn them longer, but I wanted to take them off because the edge that was at my cuticle kept catching on my hair.

034 Nail Strips 7 days

I don't know if it was just these particular ones, but oy, what a pain in the butt to remove.
There is a yellow layer, and then a black layer. I held the cotton ball over top of the nail for a minute or two to soften the polish, then I pulled it off. The yellow polish came off, so then I had black squares - after scrubbing for a bit, it finally came off, but I had little black flakes around my fingers, and occasionally a little ball of adhesive.

At the price these things are, I don't know that I'd get them again - they are REALLY cute, but for the price of a bottle or two of polish you get one manicure. For people who are into nail art, but can't / don't want to do their own, they're a great option and I would highly recommend them ... for me? I don't really think so.
(bonus: if you have really short nails, cut the strips in half, and only use one pack - save the second pack for a second manicure later!)

Sunday, September 23, 2012

Sally Hansen Nail Strips - Sound Check

This week was supposed to be a "dry marble" manicure.

Now, I've done a water marble and a needle marble ... so I had to figure out what the heck a dry marble was.
Well, it seems pretty vague - here are the examples I found when I googled it:
  • the same thing as a needle marble (most common)
  • a needle marble done on plastic, that you then peel and stick to your nails
  • painting polish onto a flat surface, then using a nail stamp to apply it to your nails
  • dipping scrunched up saran wrap into nail polish and dabbing it on to your nails
  • doing a water marble that you lift flat using plastic ... then you peel and stick to your nails (so you don't have to use so much polish I guess?)
After seeing that, I decided to just change the theme. 

I figured why not give the Sally Hansen Nail Strips a try, since I've never used them before. (and it's similar to the peel and stick ones above ... right?)
I found some on sale, I think from the Avril Lavigne line - it's called "Sound Check" and it's a black and yellow checkerboard pattern. Fun!

034 Nail Strips Sound Check

For some reason, it looks like there is a smudge on my pinkie, but I can't see it in person. I did get a little nick in the index finger near the cuticle and a teeny fold at the tip of my middle finger.
They were easy to apply - just follow the included instructions and you're good to go!
They're supposed to last 10 days, I will probably remove them before that, but I'll try to remember to take a photo right before I remove them to show you how they've worn.

Friday, September 21, 2012

Vintage Manicure

I removed my magnetic polish, and was just going to leave my nails bare for a couple of days ... but well ... I got bored, so nail polish happened.

I decided to do a vintage manicure - it was on the 52 week challenge list, but it was before I jumped in.
I've kind of always wanted to try doing one. In the 1940's, one of the styles was to leave the moon and the tip unpainted. Kind of odd looking, but it was interesting to try!

I used the image from this website as my guide. Instead of following the last step, I just made sure to create an edge that ended before my nail tip. I always use a basecoat to prevent staining, so wiping off the polish wouldn't work well.

Anyways, here is the manicure -  I went with OPI Comet Loves Cupid, one of my mini polishes, because it was red and it had a smaller brush.

033 Vintage Manicure

Not bothering to clean this one up because it's coming off probably tomorrow.
I'm going on vacation, so I'm going to be trying out Sally Hansen Nail Strips for the first time ...

Thursday, September 20, 2012

52 Week Challenge - Metallic/Magnetic

I wanted to try something combining metallic and magnetic polishes - like a half moon or something.
I tried it and it really, really didn't work.

So, here is a plain old magnetic manicure - easy and pretty.

032 Green Magnetic 52

I like putting a matching colour underneath the magnetic polish. Here I used Color Club Artsy Crafty - a dark green creme.
I find that using the magnetic polishes on their own can be a bit hit and miss - Most of them tell you to do a first coat, let it dry and then do a second coat that you use the magnet on. This seems to result in dull lines. The base polish can sometimes be pretty sheer, so you can see the metallic underneath.
Whenever I've used a regular polish in a matching dark shade (or even a black polish) it has given me a lot of definition between the lines.

The magnetic polish I used for this one is Claire's Magnetix, using the magnet provided.
The Claire's Magnetix is actually a really good polish. The brush is wide and flat - I could do my fingers in one swipe and my thumb in two. The polish is smooth, and the magnet is strong. I held the magnet over the wet polish for 10 seconds and it pulled the polish into super tight lines which spread out slowly as the polish dried.

I don't use them often, but I really love magnetic polishes.
I think I'd like to pick up some more colours if I can find them at a reasonable price. I don't like spending a lot, and magnetic polishes are usually $9 or more here in Canada.

Friday, September 14, 2012

Autumn Ruffian

I decided that I wanted to try a ruffian manicure, and the colours were an inspired by a conversation with a friend about how great orange and purple look together for autumn.

031 Autumn Ruffian

I did two coats of Essence Break Through - I have an older bottle, so it's a bright purple with a subtle shimmer. I understand the newer bottles are just a purple creme. It's really pretty! I did get some dragging at the top of the nail, but otherwise, it went on really well.

Then, starting a little lower down, I added two coats of NYC Pumpkin, an orange shimmer. I love this one - I really never thought I'd like orange nail polish, but this is great!

Ta-da! Ruffian manicure.

I think if you want something easy and pretty, this is something you should try.
Learn how to do this, a French manicure and a half-moon manicure, and you can create so many pretty looks.

Wednesday, September 12, 2012

52 Week Challenge - Patchwork

When I did a google search for patchwork manicures, two styles came up.
One that looks like a patchwork quilt, and another that just involves taping at angles.

I went with the quilt one and used the tutorial over at Kayla Shevonne's blog - easy to follow, great photos.

I skipped the white base step, because I was going to be doing greyed tones, and I didn't think it would help (if I were doing brights, I would definitely add it though)


I've been really bad about cleanup lately - this one is probably the worst! The black detail polish got everywhere (it was blobby and I accidentally got some on a finger, and it went downhill from there ...), so after spending the time getting that off and re-doing the ruined nails, I just really didn't want to spend any more time on it.
The topcoat caused the black to streak (worse on my other hand). Then, I bumped my middle finger on something and the polish rippled at the tip.

I love the look of this manicure, and it was super easy to do ... but this one was a bit disasterous.

030 Patchwork 52

I used my Claire's black detail polish and drew on the pattern (Kayla's worked really well, so I went with it - eep!). Since my nails are short, the patches weren't very square.
I elected to go with just my thumb and ring finger - I really seem to like doing the feature nails lately - don't know what it is!

The colours I chose were OPI You Don't Know Jacques, OPI Steady as She Rose and OPI Stranger Tides. I think the You Don't Know Jacques was a little too dark, so if I were to do this combo again, I'd pick a lighter colour. It still worked though - the greyed down colours are all pretty together.
I dabbed the polishes into the patchwork pattern, working one colour at a time. I ended up doing two coats of each.

Once the patches were dry, I went back in with the detail polish, re-drew the black lines and added "stitches"

For my other fingers, I just did two - three coats of each polish (index was Stranger Tides, middle was Steady as She Rose and pinkie was You Don't Know Jacques)

This week was actually supposed to be "Remember September 11th" or somesuch thing. I really couldn't bring myself to do something like that on my nails because a) I'm Canadian and b) I think it's a bit tacky.

Next week is magnetic or metallic ... I think I'm going to go with magnetic since I haven't done one in a while. Maybe I'll add metallic accents? We'll see!

Thursday, September 6, 2012

52 Week Challenge - Tape

029 Tape 52

This one was super easy.
I just picked two contrasting colours: Sally Hansen Mello Yellow and Revlon Stormy Skies.

I did 2 coats of the yellow, and waited for it to dry. I actually ended up waiting overnight, to do most of my nails because after I taped and painted my thumb and index finger, we had to go out - I thought I had more time! Waiting for it to dry (just touch your nails together, if they don't stick, it's dry), then waiting for another 5 minutes is pretty good advice.
Yellows are always a bit streaky, but since I was going to be mostly painting over this one, I could get away with two coats.

Then I took some plain old Scotch Tape, stuck it to the back of my hand and pulled it off (this reduces the stickyness so it's less likely to pull off your polish). Then I cut it into thin wedges and applied them to my nails.

Once that was all ready to go, I painted on a thick layer of the Revlon Stormy Skies. This is a brown-grey that I absolutely love.

I let it dry enough that it wasn't going to move anywhere, but was still wet (half a minute?) then I peeled off all the tape.

I've been getting a lot of comments on this one this week - the colours contrast really well, but don't clash.
I would definitely do this one again.

Saturday, August 25, 2012

52 Week Challenge - Cupcake Manicure

I wanted to try a couple of things with this manicure ...

I managed to find a bottle of Sinful Colors Mint Apple, and Sinful Colors was on sale. I cannot believe that this polish is $6 in Canada and $2 in the US. (I paid $3 for this bottle). I know things are usually more expensive up here, but 3 times the price is a bit silly.
Aaanyways ... this is a gorgeous mint green with a lovely shimmer to it. I immediately thought of it when I saw the cupcake manicure theme.

I also wanted to try out a glitter sandwich - it's where you do a sheer or "jelly" polish, add a layer of glitter, then another layer of the jelly polish.

So, here goes (please pardon my fingers - with the heat, my skin has been acting up, plus I cut my pinkie while I was making dinner last weekend):

028 Cupcake 52

I used Sinful Colors Mint Apple on my thumb, index, ring and half my middle fingers. 2 coats.
Once that was dry, on my thumb and middle fingers, I added some vertical stripes with Claire's Scented polish - Turquoise/Fruit Punch.

On my pinky, I used Sally Hansen Polar Bare - 2 coats. I did the same in a half-circle on my middle finger.
This is a super, super sheer white - after 1 coat, you couldn't really tell there was any colour to it, but 2 coats, and the white started to show.
After the white was dry, I added some blue/green/purple glitter polish from the Claire's Precious Metals collection.
Once that was dry, I topped it off with another coat of Polar Bare.

To top off the cupcake, I added a dot of OPI Comet Loves Cupid - I have a mini bottle from one of their mini box sets.

Topcoat, and done!
It's kinda cute!

Thursday, August 16, 2012

Another double post

I really wasn't sure how the Galaxy manicure would turn out, and I've been busy this week, so I didn't actually get a chance to sit down and make an attempt until tonight.

I decided that while I was at it, I would do the "bling" manicure for next week. More on that later.

I could not believe how easy this was to do and how pretty it came out:

026 Galaxy 52

2 coats OPI Black Onyx.

Then I put a bit of Sally Hansen Pink Blink onto a palette (my temporary tape-on-a-lid palette!), and used the edge of a makeup sponge to dab it on in patches
I did the same thing with Sally Hansen HD in Laser - only this time I did it over my whole nail. It's too sheer to show up much, but it toned down the pink very nicely and added a nice bit of shimmer.
I went in with OPI Nice Color Eh? and dabbed it over the pink in smaller patches.
I finished the sponging off with Sally Hansen Heat Flash in the very centre of each nebula.

After it was sufficiently dry, I dabbed on a bit of Claire's Glitter topcoat for the stars.
Then topocat to smooth it all out and voila!


Now ... the "bling" manicure. I bloody hate that word, and I'm really not into having raised things on my nails - so I skipped adding jewels.
Unfortunately, you can't see the sparkly / iridescence in the photo at all, but here's what I did instead:

027 Bling 52

I painted all my nails with Sally Hansen Heat Flash - 3 coats on all my nails except my ring finger, which received 2.

I obtained a few tiny vials of hex glitter when buying some cheap-o clear polish to use for a project. One of them is an iridescent coral, so I thought I'd try placing it on my ring finger to look like scales.

Heat Flash is a quick dry, so I didn't expect to get anywhere with that. I did a small amount of topcoat at the very top of my nail, and planned to do further small blotches as I placed the glitter. Well, the glitter was too small, the topcoat was drying too quickly,and I was too impatient, so I just slapped on some topcoat and dumped the glitter on top. I really knew I shouldn't have done that, but thankfully I didn't get much glitter outside of my workspace, and it was fairly easy to clean up. I honestly think I'm just going to chuck the rest of it in the garbage.

Anyways, I added one more coat of topcoat, then I went over it all with Essie Luxeffects Shine of the Times.
It resulted in a super shimmery iridescent feature nail.
Good Enough.


And yes, I totally cheated and have a galaxy manicure on my right-hand and the neon glitter on my left-hand.
Hah!

Monday, August 6, 2012

52 Week Challenge - Two Again

OK, I've been lazy again ... I did two manicures, took photos, but never bothered to upload them or post about them.

Bleh.


Crackle Manicure:
I guess the person who made the challenge wanted to give people a bit of a break?

I had a lovely vision in mind for this one, but it REALLY didn't work.
I used Avon Golden Twilight (black with golden-bronze flecks) and topped it off with Icing by Claire's gold crackle polish ... what a mess! The Avon polish was very pretty. The crackle polish? It was thick and goopy - If you put on a thin coat, you could see brush strokes, and it didn't crackle well at all. If you put on a thick coat, it was a nice colour, but still didn't crackle well.

Here's what I did instead:
024 Crackle 52
2 coats of Revlon Stormy Night

Random dark teal crackle polish that I've used once before. XOX Cosmetics colour #N72. It's a very odd polish, thick and goopy as well (I remember it being thinner before), but this one crackled pretty well. It smells like paint / permanent marker when you apply it, but afterward, it's a sweet almost floral scent.

OPI Topcoat to seal it all off and shine it up - I would have just left it matte to have that shiny / matte contrast, but when this particular crackle polish dries, it lightens as well - some of the areas where it went on thicker remained shiny and dark, so I figured the shine would help mask some of the stripes, and it did!


Rainbow / Pride Manicure:
I moved this one to this weekend, because Vancouver's Pride Parade was on August 5th. I missed the parade, but I did wear it downtown afterward.

I was trying to figure out how to approach this one, and I saw someone with vertically striped rainbow nails somewhere (I'm pretty sure it was in one of the blogs I read, but I can't find it)

I thought it looked really cool, and it would give me the opportunity to do ROYGBV (yep, I left out the I)

I really didn't have the patience to do sponging this weekend, so I did a few thin coats, and overlapped the colours. I used cremes for the primary colours (red, yellow, blue) and shimmers for the secondary colours (orange, green, purple)

025 Rainbow 52

Colours are:
Wet n Wild Fantasy Makers Venom
NYC Pumpkin
Sally Hansen Mellow Yellow
Wet n Wild Craze Jade
Fascino Colour #47
Icing By Claire's KTDID

phew!
I'm sure it would look better with the sponging, but I think this is pretty cute as-is.

Next week is a Galaxy Manicure - another one that I'm a bit intimidated by, but I'm sure I'll make it happen.

Saturday, July 21, 2012

52 Week Challenge - Water Marble

I actually gave my nails an entire week to breathe ... sort of.
I wore the black rock star manicure for a few days, and took it off on Monday when I posted the blog entry.
I used my Revlon Calcium Gel Nail Hardener to see if it would make any difference. My nails didn't peel any further, so I guess that's good.

Anyways, super early post!

I spent a long time looking at my collection of polishes to find which colours I wanted to use on my water marble.

Here is what I went with:
OPI Steady as She Rose - dusty pink with a hint of lavender. I used it with my needle marble manicure.
Icing by Claires KTDID - metallic purple / maroon shade.
Sally Hansen Golden-I - gold glitter polish (super dense)

I started with 2 coats of Steady as She Rose over top of my Quo by ORLY rubberized basecoat.

I used Brita filtered water brought to room temperature - I had grabbed a couple of those little paper cups they give you at takeout sushi places for your soy sauce.
I taped my fingers around my nails so cleanup would be easier.

023 Water Marble 52

Into the water, I added 1 drop of my Zoya white - just to get started without wasting my colours.
Then I did 1 drop each Steady as She Rose, KTDID, Golden-I, and a final drop of Steady as She Rose to create a nice "bullseye"

I dragged a toothpick through the polish to create a design.
Once I was happy with the design, I lowered my finger in, and used a toothpick to pick up all the excess polish on the surface of the water.

I smudged my pinky a bit, which sucks, but I didn't really want to take it off and do it again. Cleanup was a bit of a pain - the gold is not easy to get off (you can see it's still a little messy), but I couldn't imagine what it would be like without the tape!

Pretty and surprisingly easy! I don't think I'd do it often, but for a special occasion? Definitely.

Monday, July 16, 2012

52 Week Challenge - Rock Star Manicure

Apparently to do a "rock star manicure", you do a clear coat and while it's still wet, you pour loose glitter all over it, then seal.
Yeah ... no. I don't have any loose glitter in the house, and I'm not about to go buy some. That stuff is evil.

Here is what I did instead:

022 Rock Star 52

First, I filed my nails pretty short, because I like short nails with dark polish. I was going to buff them too, but then I realized when I try to take this manicure off, I'm just going to dry out my nails and make them rough, so I'll buff them before the next one.

I used Quo by ORLY Strong Bond rubberized basecoat - I'm hoping this creates enough of a barrier that the glitter is easier to remove.

Two coats OPI Black Onyx.
One Coat Claire's Glitter Topcoat. I used this one for my glitter syrup mani. It was hell to remove.
Then, I dabbed on some of the black & holo polish from the Claire's Precious Metals set. You can't see the black glitter very well, but that's ok.

Cleanup was surprisingly easy - the only "tough part" was a few pieces of the large glitter that pooled at the edge of my nail - I used a bit of remover to soften it, then lifted it off with a cuticle trimmer.

I wasn't going to put a topcoat on, because the Claire's Precious Metals polish is pretty thick, and I didn't think another layer would be smart. It dried quickly and solidly enough that I figured I could chance it. I went with my Color Club topcoat, because it's not too thick and it dries quickly. I'm glad I did, because it brightened it up a lot.

I really like the holo glitter polish. I'm glad I didn't try the loose glitter ... I don't think it would have turned out as nice.

After sharing last week's blog post on Facebook, my mom suggested a Jem and the Holograms manicure for the rock star theme - since glitter is so hard to remove, I didn't want to do another full manicure, so I did some bonus Jem inspired polish on my thumb (pardon my dry cuticles, I *just* finished removing the black):

022 Rock Star 52 Bonus

Started with Sally Hansen Insta Dri Pink Blink - 1 coat, just to give a bit of a base.
2 coats of Claire's High Maintenance mini polish. It's a sheer pink base with pink glitter.
Then I dabbed on my Claire's Precious Metals holo polish.


Next week is a Water Marble manicure. They're so pretty, and they look easy enough, but for some reason, I'm afraid to try them!

Thursday, July 12, 2012

52 Week Challenge - Gradient Nails

This week is a gradient manicure - there are three main styles:
The first is the ombre, which I did about a month ago - a different shade on each nail creating a gradient across the hand. The other two are very similar - it involves creating a gradient on each nail. The syrup mani, which involves multiple layers of a sheer polish and the sponged or layered gradient like what I did for my Earth appreciation mani.

I decided to do a layered gradient - I tried sponging, but it didn't quite take with the nail polish I chose.
It was really hard to get a good photo of this one - I took about a dozen in different light.

021 Gradient 52

I chose these colours, because I wanted to wear the manicure to a steampunk concert. I dressed up, and I figured why not have my nails match my look?

Started with Color Club Boho Mojo, 2 coats for the base - I've used this one before in a couple of manicures - obviously I like it!

I painted and sponged on OPI Shim-merry Chic from their Christmas '09 collection - I did this in two thin layers, one starting lower than the other to help the gradient along. I like this one - it's a sheer brown with red-green flakies and blue, green and orange iridescent glitter - fun! I grabbed the 'mini merries' set on sale after Christmas. I wish I had realized how pretty Shim-merry Chic was at the time so I could have picked up a full size bottle. Oh well! I'll just have to use my mini sparingly!

Then I finished off the tips with Color Club Nouveau Vintage, which is a nice shimmery bronze with some red-green in it as well.

Next week's is a Rock Star manicure ... not too sure what makes a manicure a "rock star" one ... hopefully google is my friend!

Thursday, July 5, 2012

52 Week Challenge - Canada Day

I really meant to post this at the end of last week, but I've been so busy lately.

So, like I said at the end of last week's post - this was supposed to be a 4th of July manicure, but being a Canadian, I'd like to be a bit patriotic and do a manicure for Canada Day.

I grabbed the one colour I knew I HAD to use ...
OPI Nice Color Eh? (hah, they could have made the effort to spell it "colour") It's from their 2004 Canada collection. I believe it was added to their regular connection, and was discontinued sometime in 2010. I found it for $4 at a sidewalk sale in a mall a couple of years ago, and this is actually the first time I've worn it! (I don't normally do that)

020 Canada Day 52

The polish is a pale red / dark pink with a shimmer - it really is a nice colour!
I think my dark red carpet influenced my camera to pick up the red. In most light, it was a dark pink.
I painted it on all but my ring finger using 2 coats.

On my ring finger, I used my mystery Zoya off-white.
3 coats for nice non-streaky coverage.

Once that was thoroughly dry, I stamped a maple leaf  from Bundle Monster plate BM04 over the white using the Nice Color Eh?
The plate image is actually 3 maple leaves stacked on top of each other - small, medium, large, top to bottom. I just used the largest bottom leaf.

Next week's manicure is a gradient manicure ... trying to decide on colours!
And I'm going to try to get it posted earlier this time.

Monday, June 25, 2012

52 Week Challenge - Two weeks at once!

Yep, I'm a bit late posting.
I was super busy last week, so I didn't actually finish the manicure until Thursday afternoon. When that manicure didn't work, I decided to take it off and do this week's manicure on Friday morning.
Then I didn't get a chance to update, because we took in my sister's cat, and had to spend a lot of time helping her adjust.

But, anyways ... here are two manicures for you to (hopefully) enjoy:

Last post, I said that the next manicure was rainbow/pride and according to the list, it is.
I thought about it a bit and ... well, pride parade and festival (at least here in Vancouver) isn't until August 5th, so I swapped the August 5th manicure into the June 17th spot.

So, this week I'm doing a needle marble manicure.
Here goes nothing!

018 Needle Marble 52

2 coats Steady as She Rose - I'm not much for pinks, but I really like this one, it's a pale dusty rose with a hint of lilac. I let it dry very thoroughly.
One finger at a time, painted the top half of my nail with You Don't Know Jacques and then - while it's still wet, working quickly - the bottom half with Steady as She Rose.
Again ... while it's still wet, working quickly and carefully, use a pin to drag the two colours into each other and create swirls.
Once it's all dry, apply topcoat to smooth it out and protect it.

My layers were too thick, and I got some bubbling. They took hours to dry - 3 hours after topcoat, I ended up peeling the still soft polish off of two nails.


Onto the next manicure ... Neon
Neon polish is incredibly hard to photograph - you never get true colour. I haven't tweaked this at all in photoshop, but I took it in a very well-lit area (hence the different carpet - I was at work, in front of giant windows)

019 Neon 52

This is the summer trend this year. I have the Sally Hansen Instra-Dri limited edition colour Heat Flash.
I think I'd call it a neon coral - it's a very red orange.

Oh Insta-Dri ... I don't much care for the formula or the brush.
The brush and stem are flat, so you can't wipe off excess polish very easily. The polish itself is thick, but it goes on streaky. I used 2 coats, but I could have easily gone with 3.
The best thing about this polish? I haven't used a topcoat, and while it has started to chip, it has a super high shine.

I added black crackle to my ring finger just to break up the brightness a little (random dollar store brand).
It's cute! I don't know that I'd jump on the neon trend and get more shades, but this one is nice.

Next week's manicure was supposed to be 4th of July, but since I'm Canadian, I'll be doing a Canada Day manicure.

Wednesday, June 13, 2012

52 Week Challenge - Flag Manicure

Thank Mom - I don't know why I didn't think of this flag myself!

Yarr!

*ahem*

017 Flag Manicure 52


I picked up a new basecoat to see how it works - Quo by ORLY Strong Bond, a "rubberized" basecoat. It's supposed to help prevent the polish from chipping.

2 coats of OPI Black Onyx

Then ...I just so happened to have a stamp plate with a version of the Jolly Roger on it.

This specific Jolly Roger (a skull and two crossed swords) was flown by English pirate Calico Jack Rackham. It was also featured in the Pirates of the Caribbean films as Captain Barbossa's flag.
(What's really sad, is that when I saw the plate, I knew it was Calico Jack's Jolly Roger, because I'm a little bit of a pirate nerd.)

The stamp is the centre image on Shany plate SH14. I stamped it onto my thumb, middle and pinky fingers using OPI Skull and Glossbones (yep, I couldn't resist).

Topped it off with OPI topcoat.

I'm still getting the hang of stamping, so of course the last one turned out best (my pinky in this photo). I've learned that the key with stamping is to be quick!

Next week's challenge is a Pride / Rainbow manicure

Monday, June 11, 2012

Filler Manicure

I'm still trying to figure out which flag to paint on my nails.
I'm thinking of just saying 'to hell with it' and doing the flag of Libya (it's solid green)

Anyways, my Ombre was chipping pretty badly, so I removed it and did another manicure before going to a family get-together yesterday.

2 coats of OPI Cuckoo for This Color (3 coats on a couple of nails, just because it didn't want to cooperate)

Then I chose Bundle Monster plate BM21 for the fancy filigree pattern and stamped it using Color Club Boho Mojo (seen in my very first post!)

It took a few tries, because the scraper wasn't getting all the polish off of the plate, so when I went to pick up the design, it was blobby.

I like how subtle the effect is - it's very delicate and pretty.

I'm providing two photos, because I chipped one of my nails while making dinner tonight (no, the nail polish didn't end up in the food - I'm more careful than that!), and because it was hard to get a photo.
Unfortunately, the tips are chipping already as well :(

016a Cuckoo Mojo

016b Cuckoo Mojo