Sunday, September 23, 2012

Sally Hansen Nail Strips - Sound Check

This week was supposed to be a "dry marble" manicure.

Now, I've done a water marble and a needle marble ... so I had to figure out what the heck a dry marble was.
Well, it seems pretty vague - here are the examples I found when I googled it:
  • the same thing as a needle marble (most common)
  • a needle marble done on plastic, that you then peel and stick to your nails
  • painting polish onto a flat surface, then using a nail stamp to apply it to your nails
  • dipping scrunched up saran wrap into nail polish and dabbing it on to your nails
  • doing a water marble that you lift flat using plastic ... then you peel and stick to your nails (so you don't have to use so much polish I guess?)
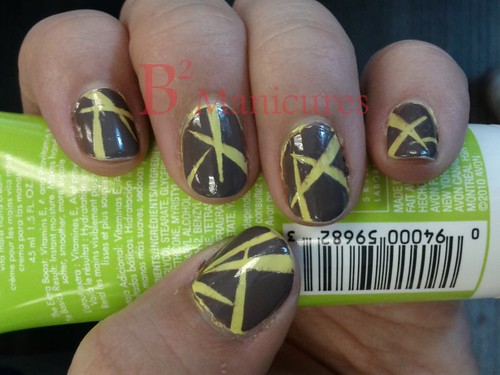
After seeing that, I decided to just change the theme. 

I figured why not give the Sally Hansen Nail Strips a try, since I've never used them before. (and it's similar to the peel and stick ones above ... right?)
I found some on sale, I think from the Avril Lavigne line - it's called "Sound Check" and it's a black and yellow checkerboard pattern. Fun!

034 Nail Strips Sound Check

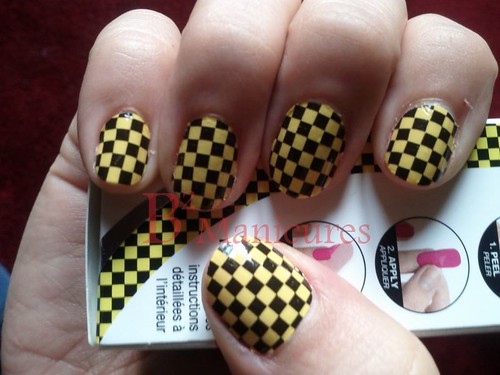
For some reason, it looks like there is a smudge on my pinkie, but I can't see it in person. I did get a little nick in the index finger near the cuticle and a teeny fold at the tip of my middle finger.
They were easy to apply - just follow the included instructions and you're good to go!
They're supposed to last 10 days, I will probably remove them before that, but I'll try to remember to take a photo right before I remove them to show you how they've worn.

Friday, September 21, 2012

Vintage Manicure

I removed my magnetic polish, and was just going to leave my nails bare for a couple of days ... but well ... I got bored, so nail polish happened.

I decided to do a vintage manicure - it was on the 52 week challenge list, but it was before I jumped in.
I've kind of always wanted to try doing one. In the 1940's, one of the styles was to leave the moon and the tip unpainted. Kind of odd looking, but it was interesting to try!

I used the image from this website as my guide. Instead of following the last step, I just made sure to create an edge that ended before my nail tip. I always use a basecoat to prevent staining, so wiping off the polish wouldn't work well.

Anyways, here is the manicure -  I went with OPI Comet Loves Cupid, one of my mini polishes, because it was red and it had a smaller brush.

033 Vintage Manicure

Not bothering to clean this one up because it's coming off probably tomorrow.
I'm going on vacation, so I'm going to be trying out Sally Hansen Nail Strips for the first time ...

Thursday, September 20, 2012

52 Week Challenge - Metallic/Magnetic

I wanted to try something combining metallic and magnetic polishes - like a half moon or something.
I tried it and it really, really didn't work.

So, here is a plain old magnetic manicure - easy and pretty.

032 Green Magnetic 52

I like putting a matching colour underneath the magnetic polish. Here I used Color Club Artsy Crafty - a dark green creme.
I find that using the magnetic polishes on their own can be a bit hit and miss - Most of them tell you to do a first coat, let it dry and then do a second coat that you use the magnet on. This seems to result in dull lines. The base polish can sometimes be pretty sheer, so you can see the metallic underneath.
Whenever I've used a regular polish in a matching dark shade (or even a black polish) it has given me a lot of definition between the lines.

The magnetic polish I used for this one is Claire's Magnetix, using the magnet provided.
The Claire's Magnetix is actually a really good polish. The brush is wide and flat - I could do my fingers in one swipe and my thumb in two. The polish is smooth, and the magnet is strong. I held the magnet over the wet polish for 10 seconds and it pulled the polish into super tight lines which spread out slowly as the polish dried.

I don't use them often, but I really love magnetic polishes.
I think I'd like to pick up some more colours if I can find them at a reasonable price. I don't like spending a lot, and magnetic polishes are usually $9 or more here in Canada.

Friday, September 14, 2012

Autumn Ruffian

I decided that I wanted to try a ruffian manicure, and the colours were an inspired by a conversation with a friend about how great orange and purple look together for autumn.

031 Autumn Ruffian

I did two coats of Essence Break Through - I have an older bottle, so it's a bright purple with a subtle shimmer. I understand the newer bottles are just a purple creme. It's really pretty! I did get some dragging at the top of the nail, but otherwise, it went on really well.

Then, starting a little lower down, I added two coats of NYC Pumpkin, an orange shimmer. I love this one - I really never thought I'd like orange nail polish, but this is great!

Ta-da! Ruffian manicure.

I think if you want something easy and pretty, this is something you should try.
Learn how to do this, a French manicure and a half-moon manicure, and you can create so many pretty looks.

Wednesday, September 12, 2012

52 Week Challenge - Patchwork

When I did a google search for patchwork manicures, two styles came up.
One that looks like a patchwork quilt, and another that just involves taping at angles.

I went with the quilt one and used the tutorial over at Kayla Shevonne's blog - easy to follow, great photos.

I skipped the white base step, because I was going to be doing greyed tones, and I didn't think it would help (if I were doing brights, I would definitely add it though)


I've been really bad about cleanup lately - this one is probably the worst! The black detail polish got everywhere (it was blobby and I accidentally got some on a finger, and it went downhill from there ...), so after spending the time getting that off and re-doing the ruined nails, I just really didn't want to spend any more time on it.
The topcoat caused the black to streak (worse on my other hand). Then, I bumped my middle finger on something and the polish rippled at the tip.

I love the look of this manicure, and it was super easy to do ... but this one was a bit disasterous.

030 Patchwork 52

I used my Claire's black detail polish and drew on the pattern (Kayla's worked really well, so I went with it - eep!). Since my nails are short, the patches weren't very square.
I elected to go with just my thumb and ring finger - I really seem to like doing the feature nails lately - don't know what it is!

The colours I chose were OPI You Don't Know Jacques, OPI Steady as She Rose and OPI Stranger Tides. I think the You Don't Know Jacques was a little too dark, so if I were to do this combo again, I'd pick a lighter colour. It still worked though - the greyed down colours are all pretty together.
I dabbed the polishes into the patchwork pattern, working one colour at a time. I ended up doing two coats of each.

Once the patches were dry, I went back in with the detail polish, re-drew the black lines and added "stitches"

For my other fingers, I just did two - three coats of each polish (index was Stranger Tides, middle was Steady as She Rose and pinkie was You Don't Know Jacques)

This week was actually supposed to be "Remember September 11th" or somesuch thing. I really couldn't bring myself to do something like that on my nails because a) I'm Canadian and b) I think it's a bit tacky.

Next week is magnetic or metallic ... I think I'm going to go with magnetic since I haven't done one in a while. Maybe I'll add metallic accents? We'll see!

Thursday, September 6, 2012

52 Week Challenge - Tape

029 Tape 52

This one was super easy.
I just picked two contrasting colours: Sally Hansen Mello Yellow and Revlon Stormy Skies.

I did 2 coats of the yellow, and waited for it to dry. I actually ended up waiting overnight, to do most of my nails because after I taped and painted my thumb and index finger, we had to go out - I thought I had more time! Waiting for it to dry (just touch your nails together, if they don't stick, it's dry), then waiting for another 5 minutes is pretty good advice.
Yellows are always a bit streaky, but since I was going to be mostly painting over this one, I could get away with two coats.

Then I took some plain old Scotch Tape, stuck it to the back of my hand and pulled it off (this reduces the stickyness so it's less likely to pull off your polish). Then I cut it into thin wedges and applied them to my nails.

Once that was all ready to go, I painted on a thick layer of the Revlon Stormy Skies. This is a brown-grey that I absolutely love.

I let it dry enough that it wasn't going to move anywhere, but was still wet (half a minute?) then I peeled off all the tape.

I've been getting a lot of comments on this one this week - the colours contrast really well, but don't clash.
I would definitely do this one again.