Tuesday, January 29, 2013

Reddit Challenge - Inspired by Technology

I think everyone was going to do circuit board nails for this one and as soon as the first (awesome) one was posted, we all changed our minds.
I know my attempt would be nowhere near as good.

I was looking around for inspiration and I figured my phone would be easy and cute.

I have a Google Nexus S:

I went with the row of 'buttons' along the bottom, and then added an Android logo on my thumb :)

60 Android 52R


I started with two coats of Essence Lime Up! on my thumb and two coats of Essence Black is Back on the rest of my fingers.
Using my Claire's White detail polish, I painted all of the icons.
Using my Claire's Black detail polish, I blocked out the android and filled in the black space with Black is Back.

ta da!

Friday, January 25, 2013

Revlon Selects Nail Polish Reviews

It's been a while, but I finally sat down and played some more with the Revlon Selects products I was sent.

The Nail Art polishes are dual-ended polishes where one side is a base coat and the other is an 'effect' of some sort. I believe the first ones were crackle sets. They also come in Neon (with a white base coat to make the neon shade pop), Moon Candy (flakies!!) and Expressionist (with a smaller detail brush)

I received an Expressionist and a Moon Candy - I'll be reviewing both!


The Moon Candy polish I received is called Orbit.
This one was hard to get a good photo of - my camera did not like it at all (but oh, if you saw it in person, I know you'd love it!)

The base colour is a super dark purple creme. It's even and opaque in one coat - I've heard the Moon Candy polishes are like this, but I wasn't really expecting it to be THAT solid.
I love it. I honestly don't know what else I can say - it's a great polish.

The other side is a purple/blue/green flakie in a clear purple base. A lot of people complained that the flakies were hard to apply and hung off the edge of the nail. I can definitely see this - I dabbed the polish on, because that's how I'm used to applying most glitter and flakies, and the flakies were a bit on the unruly side, but I was able to place them easily enough.
The manicure was a bit lumpier than I'm used to, so I ended up having to use two coats of my topcoat.

I can't stop looking at the colour shift.

058 Revlon Moon Candy


The Expressionist polish I received is called "Vincent Van Gold"
I guess my camera doesn't like dark purples very much, because this one was hard to photograph as well.

The base colour side is dark purple with a blue shimmer - super pretty. I used it on it's own first, and it was a little too sheer for my taste.
For this manicure, I first did a coat with the base from the Moon Candy polish, then applied the Expressionist polish over top. I think this one is sheer, because it's a shimmery polish - I'm sure the ones with the creme polish base will be similar to the Moon Candy base polish.
Anyways, the colour is gorgeous and the application was nice and smooth.

The detail polish is a bright gold.
For the design, since I was doing this later at night after a busy day, I wanted something simple, so I opted for stripes - I did two vertical on one side of my nail, then two horizontal near the top of my nail.
I only had to do one coat to get solid coverage, which is essential with detail polishes.
The brush isn't as thin and long as some of the detail polishes you can find, but it's nice and flexible. I actually find the slightly shorter length to be a benefit - there is less room for wiggling if you've got shaky hands! It's easy enough to shape the brush against the mouth of the bottle to get a thinner line if you want it.
I think the thicker brush will allow you to do dots a lot easier - I'll have to give that a shot some time.

057a Revlon Expressionist

057b Revlon Expressionist

Tuesday, January 22, 2013

Reddit Challenge - Splatter Manicure

My last splatter manicure was a feature nail, because I really wasn't sure how I'd like the technique.
I'm still undecided. It's fast, but it's messy. This time, I wanted to go with all my fingers, and it's actually growing on me ...

059 Splatter 52R

I started with a base of Essence High Spirits - in the bottle this looks like some sort of gold-ish olive colour, but on the nail, it's a gorgeous sage green with a subtle shimmer
I actually did this as a straight manicure on Friday night, so what you see here is 3 and a bit days wear - almost no tip-wear and no chipping! Oh Essence - for a cheapie polish, you are amazing.

Instead of removing a perfectly good colour to do a splatter manicure that I wasn't sure I'd leave on for any length of time, I just splattered over top of it.

I hunted through my collection and found one I thought would match well and be a good consistency for splattering (my last one was too thick and came out a bit lumpy).
I went with Color Club Port-Folio. I got it in a box set from a friend. At first, I thought it was a brown / green duochrome, but it's actually purple! (the "Port" portion of the name should have given that away, I guess ...). I think this is my third purple/green duochrome? oops! I really don't like having more than one of the same colour. Granted, the other two duo-chrome in opposite directions and are different shades, but still, it's a bit much - haha! I'll have to do a side-by-side comparison to see if they are too similar and then I'll give one or two away.
Anyways, you can *just* see the duochrome effect on my index and ring fingers, and a little bit on my thumb.

I love this colour combo, and will have to try it again sometime.

Later this week, I'll have a review of BOTH nail polishes that I received from Revlon Selects.
Next week, the challenge is "Inspired by Technology"
Finally, I also want to take some photos of my collection, now that it is nicely stored away in my Melmer!

Wednesday, January 16, 2013

Reddit Challenge - Decals

A nail blogger I've been reading for a few months - Rebecca Likes Nails - is having a 2-year blog birthday giveaway ... head on over and enter!!


This one actually took me a couple of tries - I wasn't happy with either, but here's the one I'm sharing:

056 Decal 52R


I started with two coats of Sally Hansen Heat Flash - a bright neon coral (it matches my site!)

On all but my ring finger, I topped it off with Icing By Claire's Rave Royalty - a gold/orange flakie (I'd say it's more like shards) that has the occasional flash of green. The polish is in a very sheer coral base, which does show if you put it on bare nails, but there is no way you could build it up to opaque. I had to dab the flakies on rather than use it like a normal polish, but I love it!

I added the decals to my ring finger. The decals I have are a little too thick and my nails are a little too curved, so they don't lie flat. They're cute though! I actually got them at a dollar store, so I guess I couldn't expect much.


I bought a few things at Michael's craft store the other day, and I got a 40% coupon for a single item this week. I decided to go buy a Recollections 3 Drawer Organizer Cube also known in the online nail polish world as a "Melmer"  (It's like a smaller version of Ikea's Helmer cabinet, and it's from Michael's ... so Melmer).

I got it put together in about an hour, and put shelf liner in the bottoms of the drawers (a tip I saw over at A Polished Touch) and started to fill it up.
I have to figure out how I want to put the polishes in ... by colour or by brand? I should let my husband organize it, he loves that sort of thing.
It doesn't look like my polish will even fill up one drawer - and some people have multiple Melmers!!
I'll take some photos when I'm done and share in another post.

Sunday, January 6, 2013

Reddit Challenge - Inspired by a Book

This was another tough one - I have a lot of trouble with imagery apparently.

I was going to just do Harry Potter, but it's been done so many times, I didn't want to end up with exactly the same thing as someone else.

Granted, this design does use 3 designs from other manicures, I haven't seen them all combined into one.

I give credit for this one to a co-worker. He found out I do my nails and have this blog, and when I told him that my next manicure was supposed to be inspired by a book he said,
"can I pick the book?"
and I replied,
"sure, why not?"

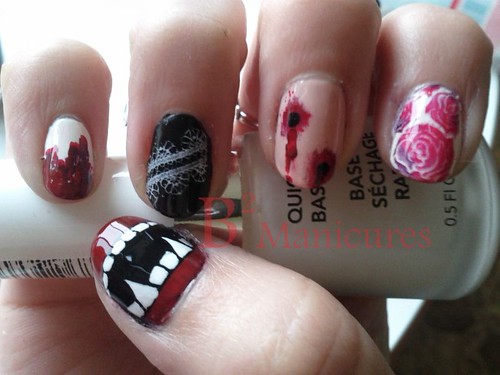
Without further ado - here is my Interview With The Vampire manicure:

055 Interview 52R

I haven't read the book in ages, and I haven't seen the movie in ... well, probably longer, but I figured a vampire theme would be easy.

For my thumb, I did a coat of Sally Hansen's Burgundy Child from their No Chip 10 Day line (long discontinued), which I went over with a coat of OPI Comet Loves Cupid. I (for some unknown reason) don't actually have a proper vampy red. I went over the middle of that with OPI Black Onyx and used my Quo by ORLY black detail polish to even it out. Then I went over that with my Claire's White detail polish to create the teeth.
Burgundy Child is a very deep plum colour with a bit of shimmer. I really like it, but rarely wear it.

For my index finger, I did two coats of Zoya White and stamped on some roses from Bundle Monster plate BM-323 using Comet Loves Cupid and Burgundy Child. I was hoping it would swirl together, but it didn't at all. The Comet Loves Cupid was quite sheer over the white, so it came out almost pink. Oh well.

For my middle finger, I used 2 coats of Essence Modern Romance. I created vampire bites using a q-tip first dipped in Burgundy Child, then Comet Loves Cupid. I added black dots in the middle of the splotchy marks and then did blood drips (again with the burgundy then red over top)

For my ring finger, I did 2 coats of OPI Black Onyx and stamped on the diagonal lace pattern from Bundle Monster Plate BM-323 using my Claire's White detail polish (it's more opaque than the Zoya).

And finally, for my pinky I did two coats of Zoya White, then I scraped most of the polish off the brush of the Burgundy Child and dragged that over the tip, then I did the same for Comet Loves Cupid.

This was all rather time consuming, because I did all the base colours first, then decided to change the order of them, then I kept messing it up. Since it took so long, I gave up on my left hand and just painted them all black (except my pinky, which is the white with red streaks).

I really like each nail - I think the index finger would fit better with a deeper red, but it still looks good. If I was to do it again, instead of the roses, I might go for the theatre masks from Shany Plate SH02, to represent Louis and Claudia arriving at the Théâtre des Vampires.


Next week's theme is decal / transfer - looking forward to an easy week! (I'll probably jazz it up a little, but after this week, I need something easy!)

Tuesday, January 1, 2013

New Year's Manicure

This week's Reddit Challenge was New Years - even if I wasn't doing the challenges, I'd still want pretty nails for New Years Eve.

I knew months ago that I wanted to do a glitter gradient, and it seems that they're the 'it' thing right now - which is pretty awesome.

I tried it with the glitter at the top of my nail this time and I went with a subtle colour combo.
Please pardon the tip wear - my nails are too short for me to wrap the tips and the top coat I used seems to be causing the polish to shrink (you can see on my thumb where I didn't quite get it all the way to the edge, so the polish cracked vertically)

054 New Years 52R

I used two coats Color Club Blue-topia - it looks black, but it's actually a deep inky blue. First coat is pretty sheer, but it would be hard to do this one as a single-coat polish because wherever you overlap, it gets darker.

The gradient was done using Essence Choose Me! a teal glass fleck polish. I dabbed it on near the cuticle and dragged it down my nail to create the gradient effect - I used a few layers to build it up closer to the cuticle.

This one was really hard to photograph - the contrast is much more obvious in person.