Saturday, July 21, 2012

52 Week Challenge - Water Marble

I actually gave my nails an entire week to breathe ... sort of.
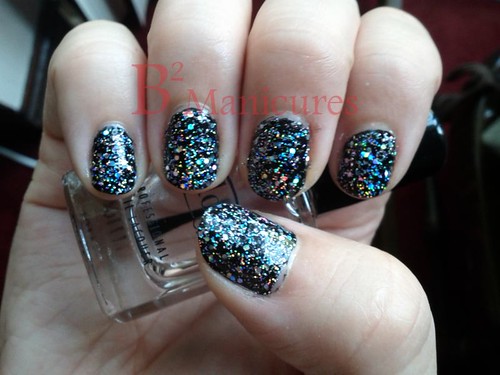
I wore the black rock star manicure for a few days, and took it off on Monday when I posted the blog entry.
I used my Revlon Calcium Gel Nail Hardener to see if it would make any difference. My nails didn't peel any further, so I guess that's good.

Anyways, super early post!

I spent a long time looking at my collection of polishes to find which colours I wanted to use on my water marble.

Here is what I went with:
OPI Steady as She Rose - dusty pink with a hint of lavender. I used it with my needle marble manicure.
Icing by Claires KTDID - metallic purple / maroon shade.
Sally Hansen Golden-I - gold glitter polish (super dense)

I started with 2 coats of Steady as She Rose over top of my Quo by ORLY rubberized basecoat.

I used Brita filtered water brought to room temperature - I had grabbed a couple of those little paper cups they give you at takeout sushi places for your soy sauce.
I taped my fingers around my nails so cleanup would be easier.

023 Water Marble 52

Into the water, I added 1 drop of my Zoya white - just to get started without wasting my colours.
Then I did 1 drop each Steady as She Rose, KTDID, Golden-I, and a final drop of Steady as She Rose to create a nice "bullseye"

I dragged a toothpick through the polish to create a design.
Once I was happy with the design, I lowered my finger in, and used a toothpick to pick up all the excess polish on the surface of the water.

I smudged my pinky a bit, which sucks, but I didn't really want to take it off and do it again. Cleanup was a bit of a pain - the gold is not easy to get off (you can see it's still a little messy), but I couldn't imagine what it would be like without the tape!

Pretty and surprisingly easy! I don't think I'd do it often, but for a special occasion? Definitely.

Monday, July 16, 2012

52 Week Challenge - Rock Star Manicure

Apparently to do a "rock star manicure", you do a clear coat and while it's still wet, you pour loose glitter all over it, then seal.
Yeah ... no. I don't have any loose glitter in the house, and I'm not about to go buy some. That stuff is evil.

Here is what I did instead:

022 Rock Star 52

First, I filed my nails pretty short, because I like short nails with dark polish. I was going to buff them too, but then I realized when I try to take this manicure off, I'm just going to dry out my nails and make them rough, so I'll buff them before the next one.

I used Quo by ORLY Strong Bond rubberized basecoat - I'm hoping this creates enough of a barrier that the glitter is easier to remove.

Two coats OPI Black Onyx.
One Coat Claire's Glitter Topcoat. I used this one for my glitter syrup mani. It was hell to remove.
Then, I dabbed on some of the black & holo polish from the Claire's Precious Metals set. You can't see the black glitter very well, but that's ok.

Cleanup was surprisingly easy - the only "tough part" was a few pieces of the large glitter that pooled at the edge of my nail - I used a bit of remover to soften it, then lifted it off with a cuticle trimmer.

I wasn't going to put a topcoat on, because the Claire's Precious Metals polish is pretty thick, and I didn't think another layer would be smart. It dried quickly and solidly enough that I figured I could chance it. I went with my Color Club topcoat, because it's not too thick and it dries quickly. I'm glad I did, because it brightened it up a lot.

I really like the holo glitter polish. I'm glad I didn't try the loose glitter ... I don't think it would have turned out as nice.

After sharing last week's blog post on Facebook, my mom suggested a Jem and the Holograms manicure for the rock star theme - since glitter is so hard to remove, I didn't want to do another full manicure, so I did some bonus Jem inspired polish on my thumb (pardon my dry cuticles, I *just* finished removing the black):

022 Rock Star 52 Bonus

Started with Sally Hansen Insta Dri Pink Blink - 1 coat, just to give a bit of a base.
2 coats of Claire's High Maintenance mini polish. It's a sheer pink base with pink glitter.
Then I dabbed on my Claire's Precious Metals holo polish.


Next week is a Water Marble manicure. They're so pretty, and they look easy enough, but for some reason, I'm afraid to try them!

Thursday, July 12, 2012

52 Week Challenge - Gradient Nails

This week is a gradient manicure - there are three main styles:
The first is the ombre, which I did about a month ago - a different shade on each nail creating a gradient across the hand. The other two are very similar - it involves creating a gradient on each nail. The syrup mani, which involves multiple layers of a sheer polish and the sponged or layered gradient like what I did for my Earth appreciation mani.

I decided to do a layered gradient - I tried sponging, but it didn't quite take with the nail polish I chose.
It was really hard to get a good photo of this one - I took about a dozen in different light.

021 Gradient 52

I chose these colours, because I wanted to wear the manicure to a steampunk concert. I dressed up, and I figured why not have my nails match my look?

Started with Color Club Boho Mojo, 2 coats for the base - I've used this one before in a couple of manicures - obviously I like it!

I painted and sponged on OPI Shim-merry Chic from their Christmas '09 collection - I did this in two thin layers, one starting lower than the other to help the gradient along. I like this one - it's a sheer brown with red-green flakies and blue, green and orange iridescent glitter - fun! I grabbed the 'mini merries' set on sale after Christmas. I wish I had realized how pretty Shim-merry Chic was at the time so I could have picked up a full size bottle. Oh well! I'll just have to use my mini sparingly!

Then I finished off the tips with Color Club Nouveau Vintage, which is a nice shimmery bronze with some red-green in it as well.

Next week's is a Rock Star manicure ... not too sure what makes a manicure a "rock star" one ... hopefully google is my friend!

Thursday, July 5, 2012

52 Week Challenge - Canada Day

I really meant to post this at the end of last week, but I've been so busy lately.

So, like I said at the end of last week's post - this was supposed to be a 4th of July manicure, but being a Canadian, I'd like to be a bit patriotic and do a manicure for Canada Day.

I grabbed the one colour I knew I HAD to use ...
OPI Nice Color Eh? (hah, they could have made the effort to spell it "colour") It's from their 2004 Canada collection. I believe it was added to their regular connection, and was discontinued sometime in 2010. I found it for $4 at a sidewalk sale in a mall a couple of years ago, and this is actually the first time I've worn it! (I don't normally do that)

020 Canada Day 52

The polish is a pale red / dark pink with a shimmer - it really is a nice colour!
I think my dark red carpet influenced my camera to pick up the red. In most light, it was a dark pink.
I painted it on all but my ring finger using 2 coats.

On my ring finger, I used my mystery Zoya off-white.
3 coats for nice non-streaky coverage.

Once that was thoroughly dry, I stamped a maple leaf  from Bundle Monster plate BM04 over the white using the Nice Color Eh?
The plate image is actually 3 maple leaves stacked on top of each other - small, medium, large, top to bottom. I just used the largest bottom leaf.

Next week's manicure is a gradient manicure ... trying to decide on colours!
And I'm going to try to get it posted earlier this time.